1. Electrical Safety around the Home.
Electrical Check list:

Powerpoints - Physical & Connection Check.
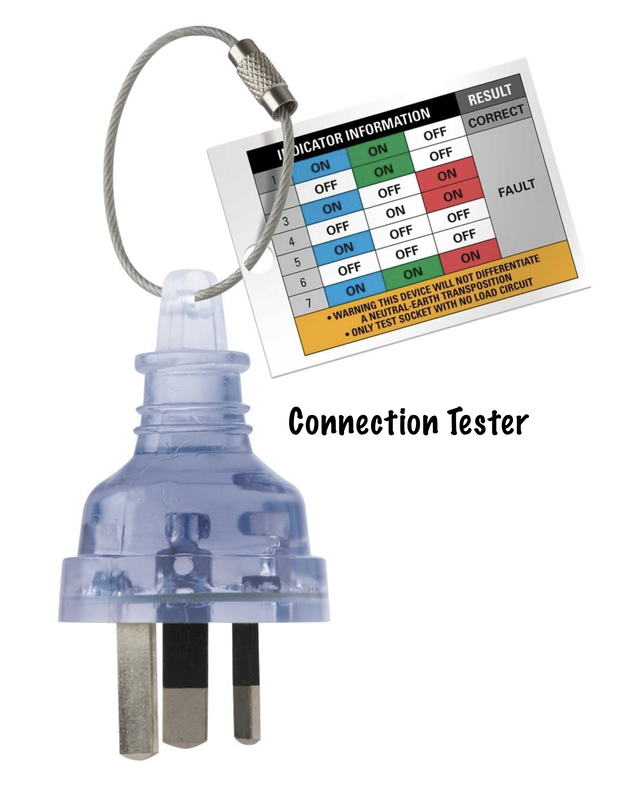
The Electrical Check List above and the Connection Check outlined below are very important. They also come into play when purchasing, renting or leasing a house, flat etc. as these checks may not be done as part of the normal building inspections. The 'Connection Tester' below can also be a very handy item to lend to family and friends!
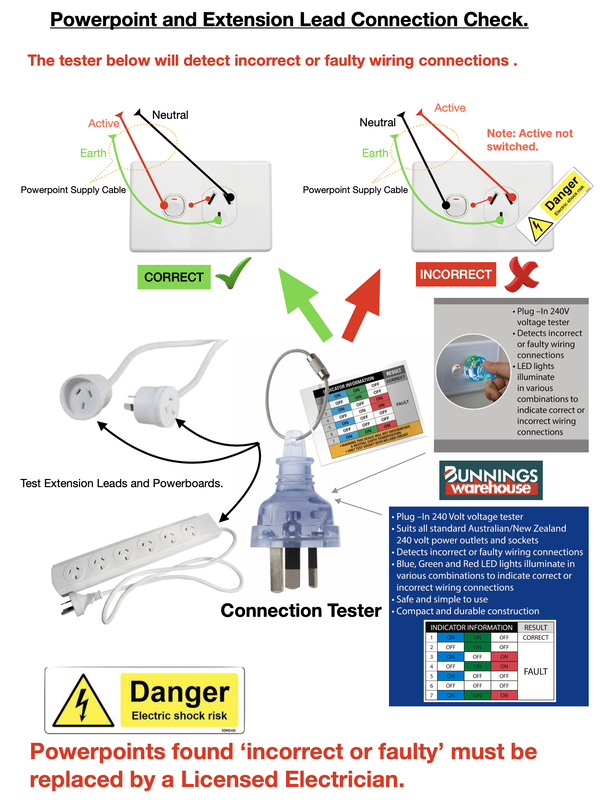
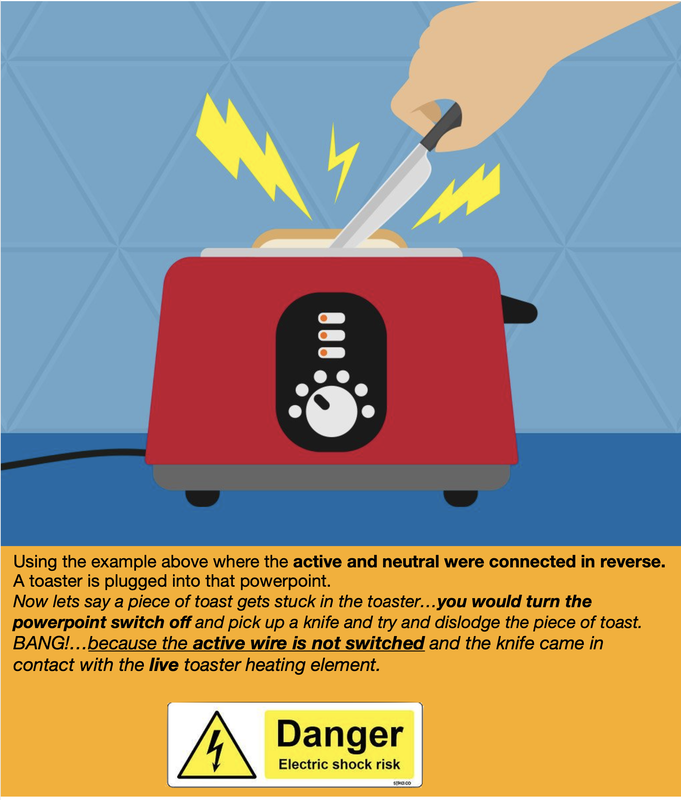
Note: Residual Current Devices(RCDs) may not protect against a powerpoint wired with its active and neutral terminals reversed.
A residual current device(RCD), or safety switch, protects you from the most frequent cause of electrocution - a shock from electricity passing through the body to the earth. It can also provide some protection against electrical fires. They offer high levels of personal protection from electric shock.
|

|
Connection Testers are available at....
*Any 'Fault' indicated - Call a Licensed Electrician.
|
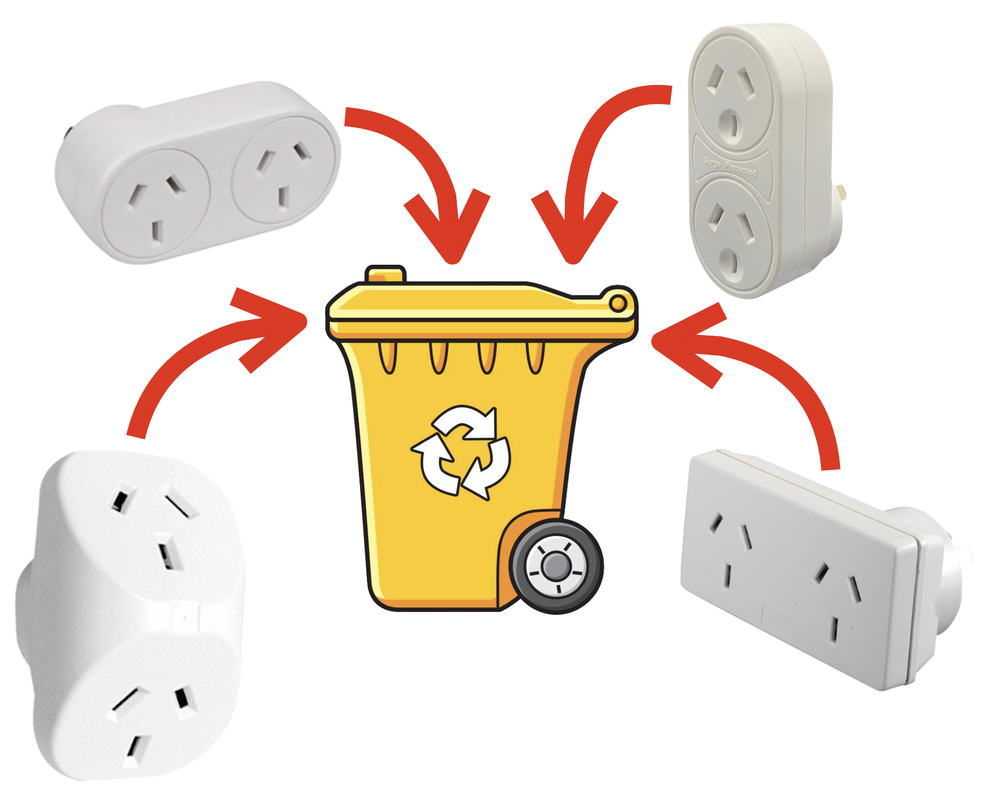
Are Double Adapters Safe?

|
One of the most common problems we come across nowadays is people finding themselves running out of power sockets to plug all their appliances in. In fact, if you look behind the TV unit in most lounge rooms you will most likely come across a tangle of wires and powerpoint extensions and adapters. It seems to have become common practice to grab a double adapter to give yourself an extra socket, whether it be to charge an extra mobile phone or run a couple of appliances off. But are double adapters safe?
Double adapters can seem like the quick, easy option to solve a short term need. However, when they become part of the integral electrical design of a home or business, you are setting yourself up for problems. |
Why are Double Adapters Dangerous?
One of the biggest problems is that double adapters don’t provide any overload protection. This means they can be easily be overloaded if you have a high-drawing appliance such as a heater or hair dryer or too many devices running off the same outlet. They can overheat quickly and it’s a common cause of house fires.
The risk of electrical fire is further increased when you start piggy-backing or daisy-chaining power boards. The practice of plugging a double adapter into another power board is an absolute recipe for disaster and a house fire waiting to happen.
Apart from the risk of fire and wiring looking unsightly, overloading power boards is one of the most common causes of frequent circuit breaker tripping.

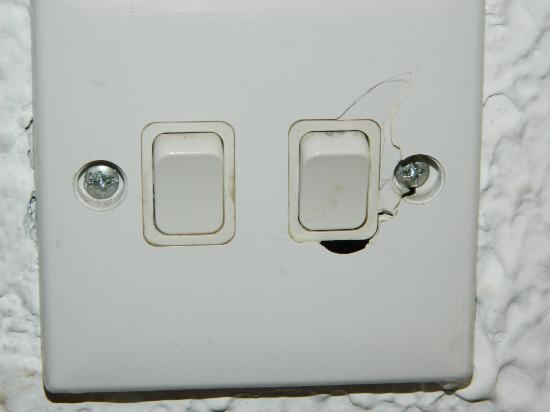
Another common problem with double adapters is the design. Many have sloping sides which means that when a device is plugged in, it is easier for it to become dislodged. If the pins of the plug are exposed this is effectively a live electrical current. If anything comes into contact with it, be it a child’s finger, a pet’s collar or a piece of jewellery, it could result not only in electrocution but also risks blowing a circuit if you don’t have a safety switch installed on it.
Many cheap or old double adapters may not even comply with Australian standards. In fact, they are considered so dangerous that they are banned in some states like Victoria, where they cannot be used on building sites. It’s really not worth taking the risk, if you’ve had a double adapter sitting in the cupboard for a number of years. So it looks like the definitive answer to: ‘are double adapters safe?’ is a resounding: ‘No – absolutely not’. So what’s the solution?
Many cheap or old double adapters may not even comply with Australian standards. In fact, they are considered so dangerous that they are banned in some states like Victoria, where they cannot be used on building sites. It’s really not worth taking the risk, if you’ve had a double adapter sitting in the cupboard for a number of years. So it looks like the definitive answer to: ‘are double adapters safe?’ is a resounding: ‘No – absolutely not’. So what’s the solution?

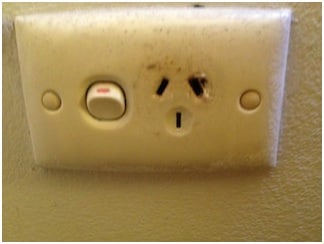
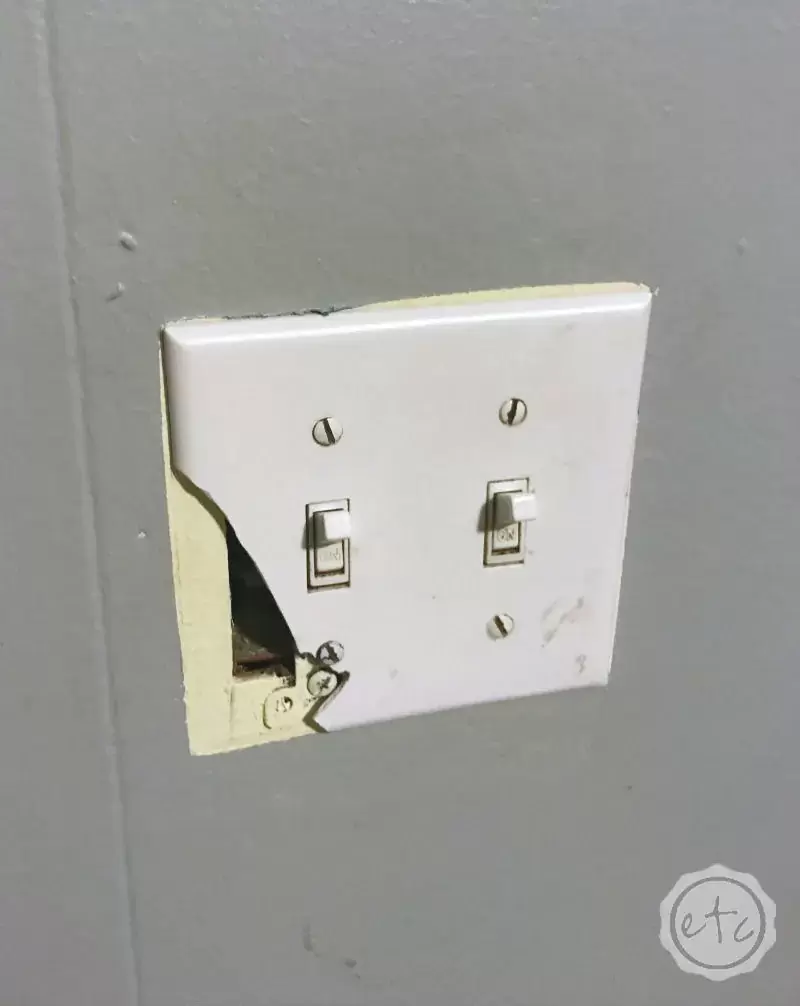
Result of a Double Adapter becoming dislodged in this powerpoint.
|
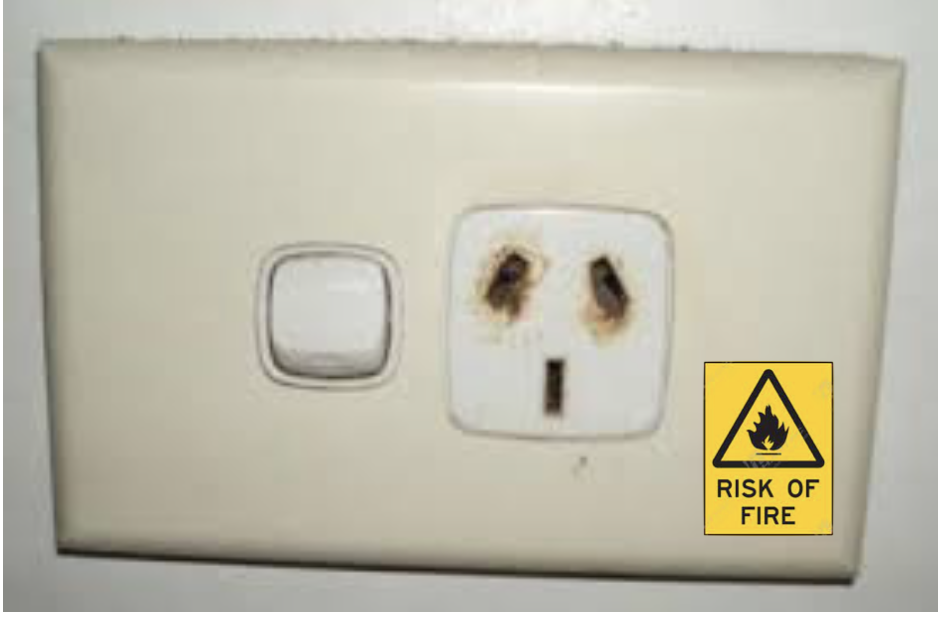
Burns due to arcing, causing socket sections to loose their spring tension thus plugs become loose in the socket.
|
What should you use instead?
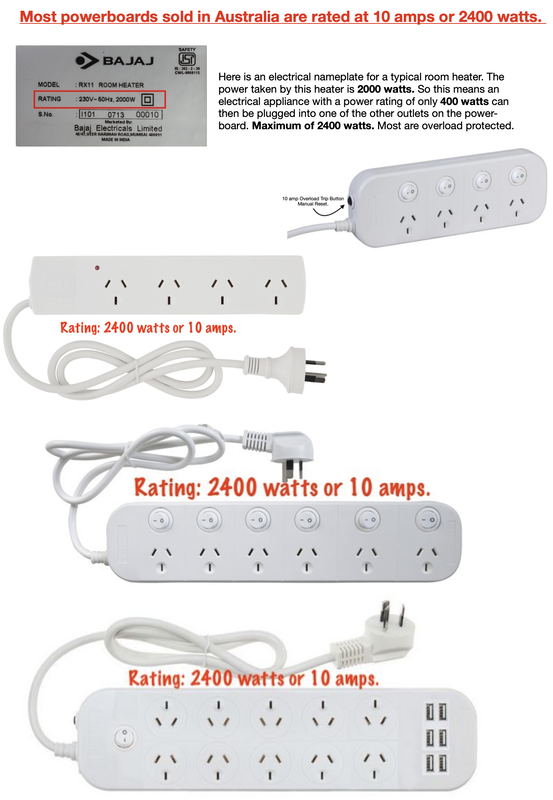
So if double adapters aren’t safe, is it better to use a power board? Well, power boards are certainly safer providing they have surge protection such as a circuit breaker or safety switch. Look for a power board with a reset ‘red’ button. However, while they are a safer option, they should not be relied on as a permanent solution to your expanding power needs.
The simplest, most-effective solution to the need for more power sockets is to ask your electrician to install more general-purpose outlets (GPOs).
Note: A GPO is typically rated per socket, so you should be able to draw 10amps off each, assuming the rest of the wiring and circuit load is suitably rated. A double (2 gang) GPO is rated at 10Amps current draw for each switched socket.
Powerboards.
Click the buttons...
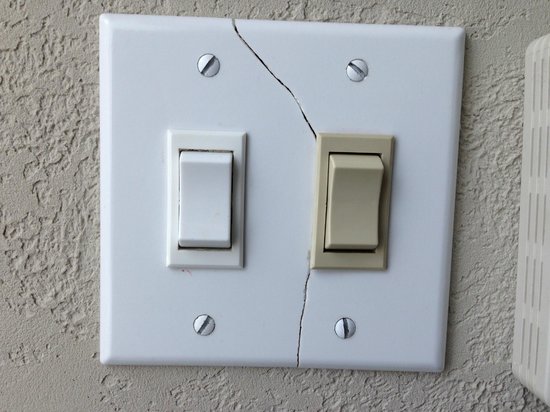


Faulty Powerpoints & Light Switches
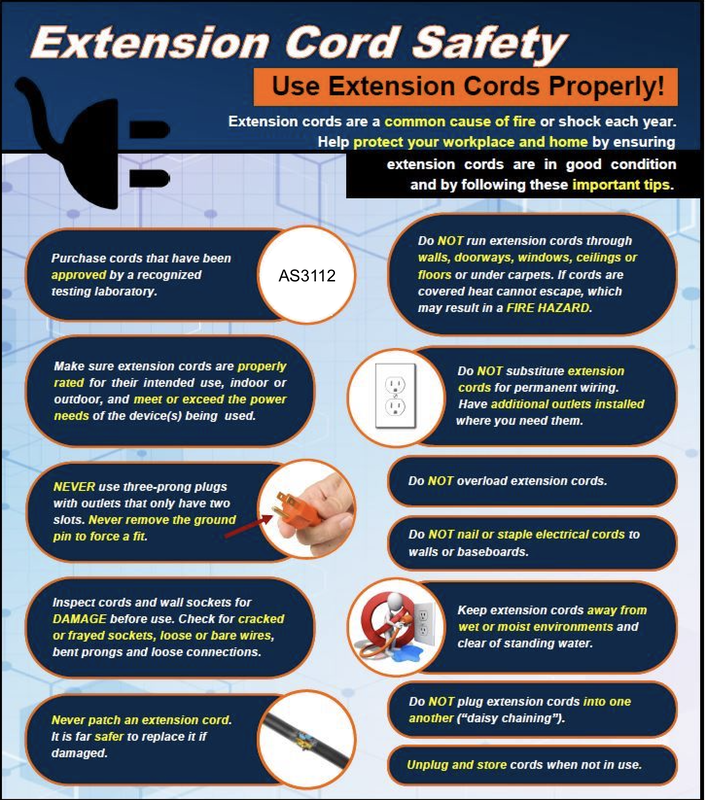
Extension Cords.
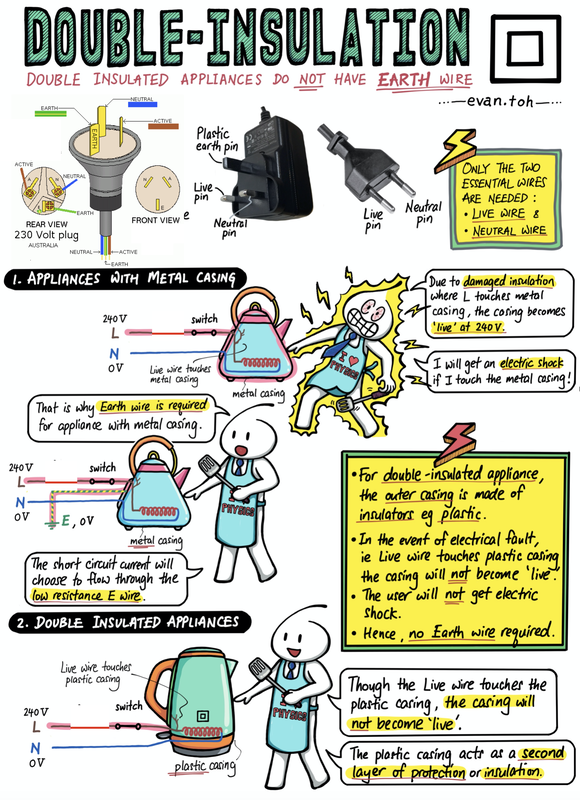
'Double Insulated' Power Tools and Appliances.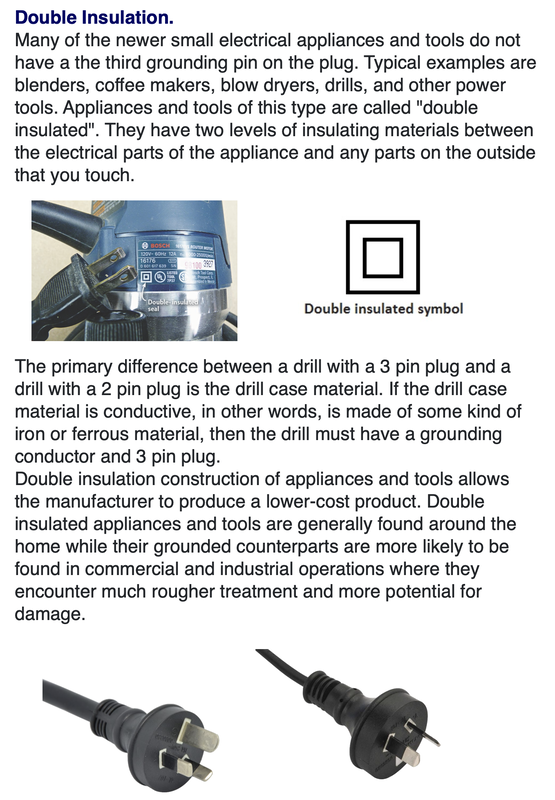
|
|
2. Plumbing Checks around the Home.

Click on button...
3. Lamp Comparison Information.
Hints:
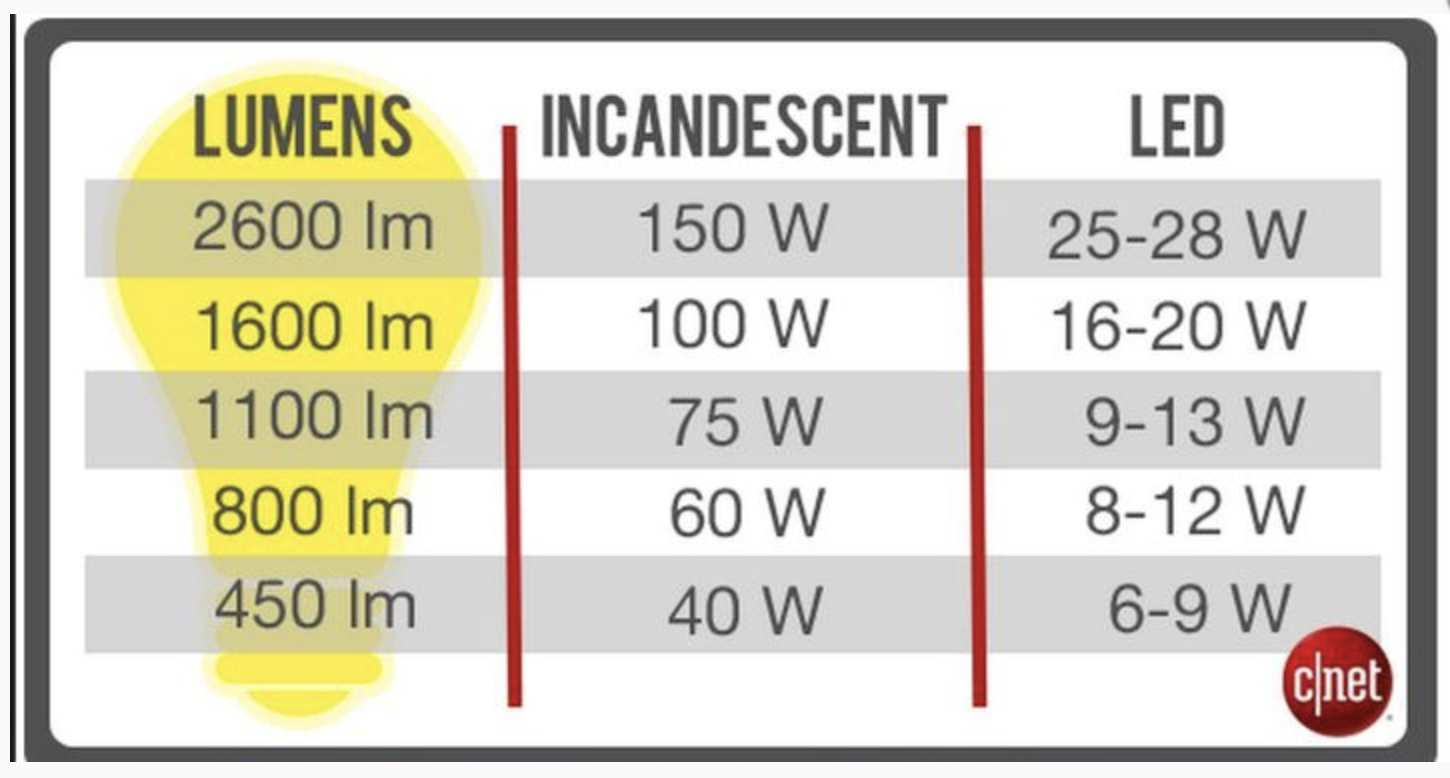
'Output Lumens' is the value to remember when comparing...e.g. 60 watt incandescent is 800 lumens so the equivalent LED you will be looking for is between 6 & 12 watts (approx.) then the 'Colour Temperature' is next, see the 'Kelvin Colour Temperature Scale' chart below.
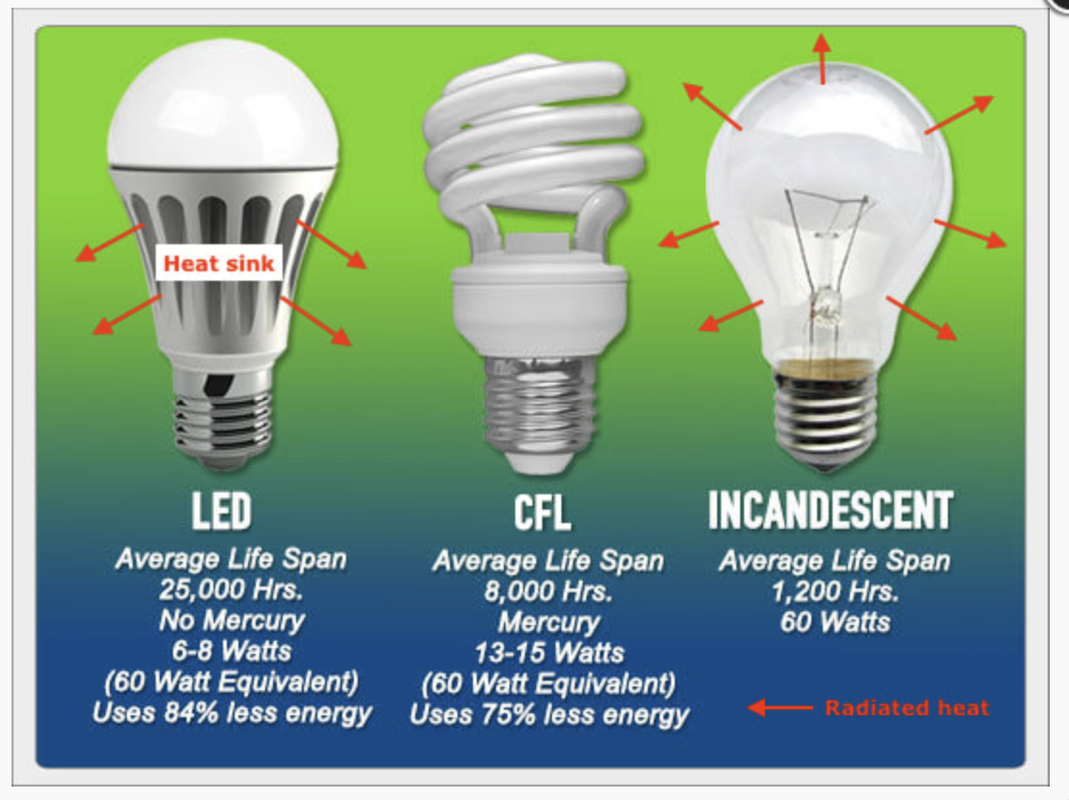
'CFL' means Compact Fluorescent Lamp.
Note: Heat is radiated out in all directions in Incandescent and halogen lamps where as the heat is radiated from the rear of an LED lamp....thus see heat sink location above. LEDs emit very little heat. In contrast, incandescent and halogen bulbs release 90% of their energy as heat, CFLs release about 80% of their energy as heat.
'Output Lumens' is the value to remember when comparing...e.g. 60 watt incandescent is 800 lumens so the equivalent LED you will be looking for is between 6 & 12 watts (approx.) then the 'Colour Temperature' is next, see the 'Kelvin Colour Temperature Scale' chart below.
'CFL' means Compact Fluorescent Lamp.
Note: Heat is radiated out in all directions in Incandescent and halogen lamps where as the heat is radiated from the rear of an LED lamp....thus see heat sink location above. LEDs emit very little heat. In contrast, incandescent and halogen bulbs release 90% of their energy as heat, CFLs release about 80% of their energy as heat.
Information on the packet when buying a LED lamp:

|
From this LED lamp box you can read on the front that it is a 12 watt LED which is equivalent to a 60 watt incandescent lamp. Its light output is 806 lumens and it has a colour temperature of 2700K. This colour is shown on the side of the box as 'warm white'.
Note: This particular lamp is also dimmable....click on the button below to see information on this topic. |
Buying a LED Lamp:
Step 1. Work out the Lumens and the LED watts....knowing the comparable incandescent lamp watts.
Step 2. Decide on the colour temperature you want.


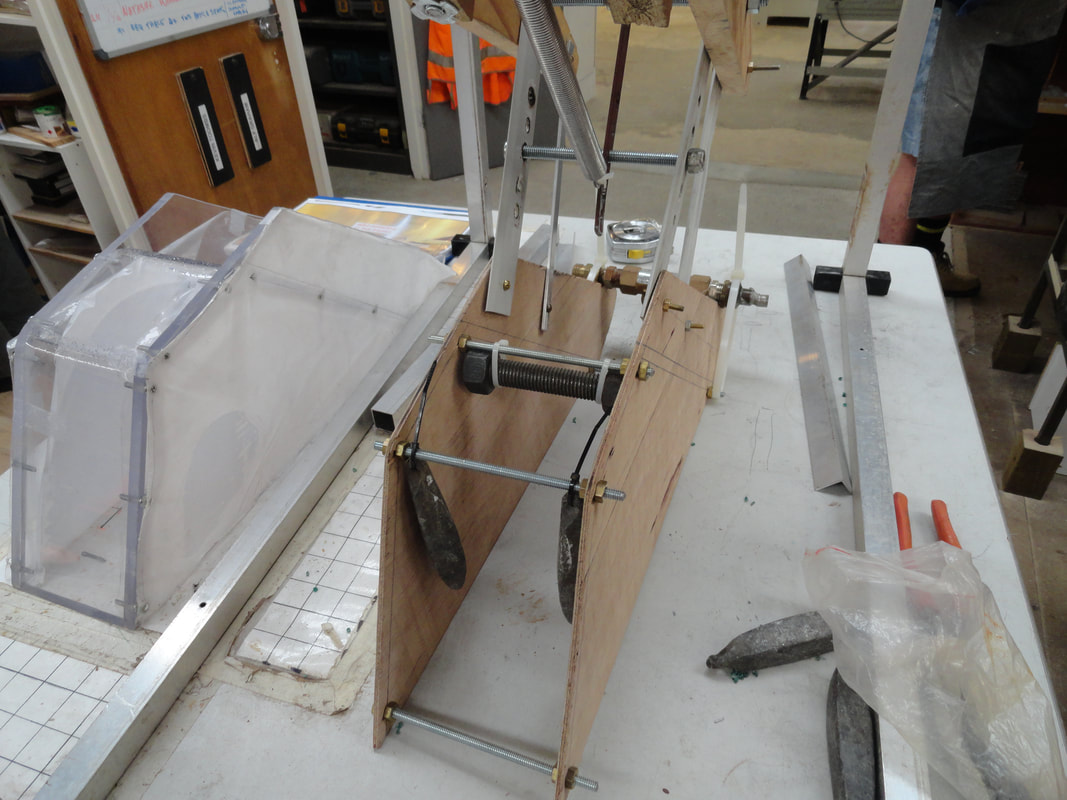
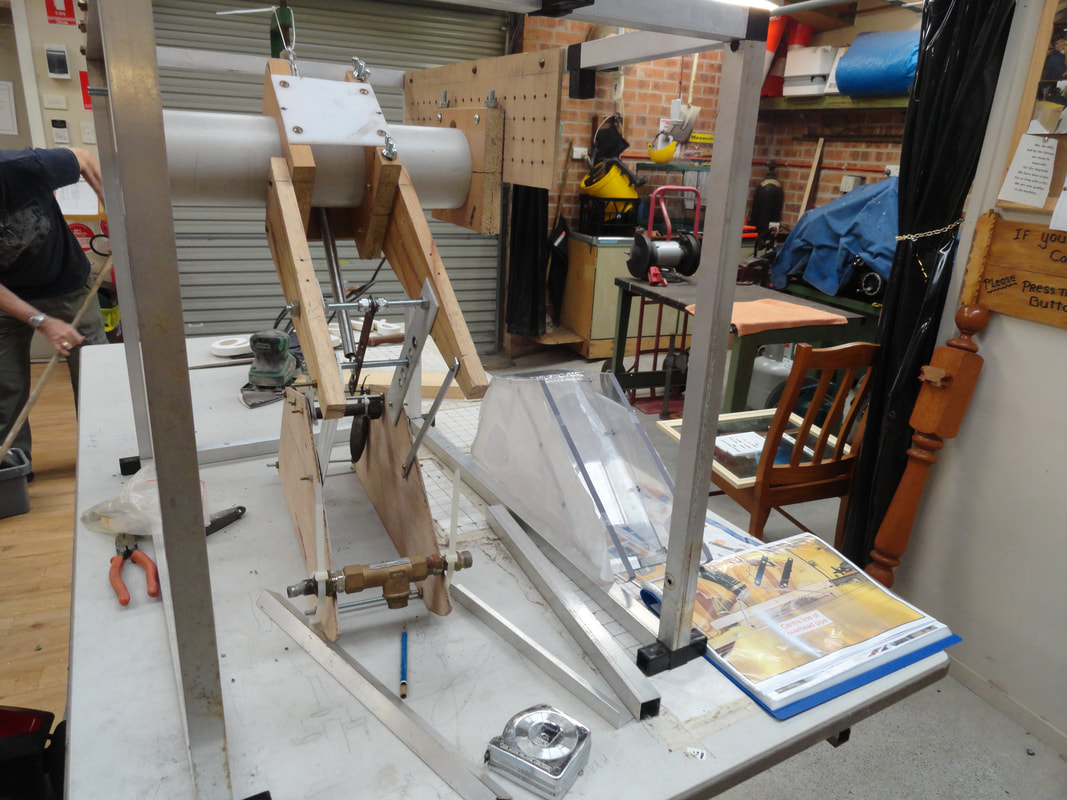
4. Flatmaster 24" V Drum Sander.
June 2020
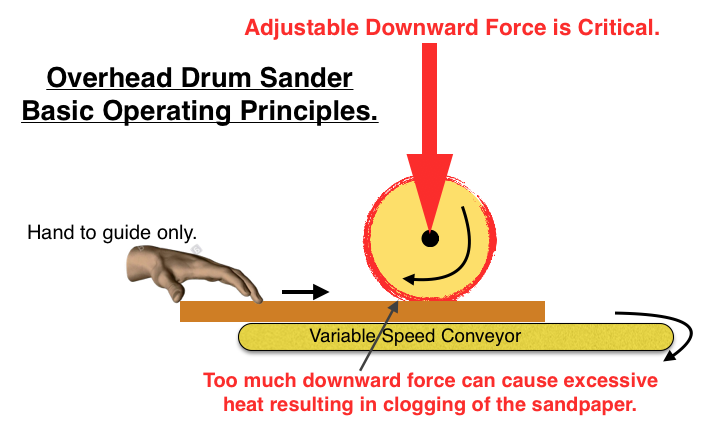
With over 70 members we have found it difficult to keep our overhead type 18" drum sander maintained and adjusted correctly. It generally resulted in the sandpaper overheating and clogging with resins etc. Also we could not sand end grain or edges.

Our desire to use more recycled timber has also helped to drive the project.
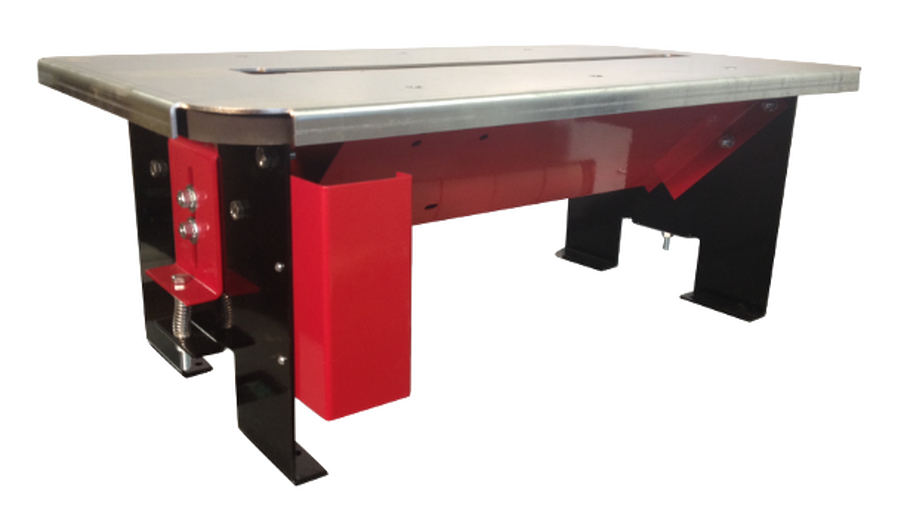
So we decided to import an underside type 24" Flatmaster V Drum Sander from the manufacture 'Stockroom Supply Company' in Wainfleet, Ontario, Canada. http://stockroomsupply.ca/shop/
The two packages consisted of a 24" model, two pair of heavy duty aluminium fence kits, a link belt and two 3" dia. x 5/8" bore, balanced cast iron pulleys. Total weight 40.82kgs. The sander was purchased without a motor due to the extra shipping weight and frequency differences....see frequency details below.
We had a suitable motor and start/stop switch.
The overall project cost ~$2,000 AUD....this was acceptable as we now see more members using this versatile and easy to use drum sander.
We had a suitable motor and start/stop switch.
The overall project cost ~$2,000 AUD....this was acceptable as we now see more members using this versatile and easy to use drum sander.

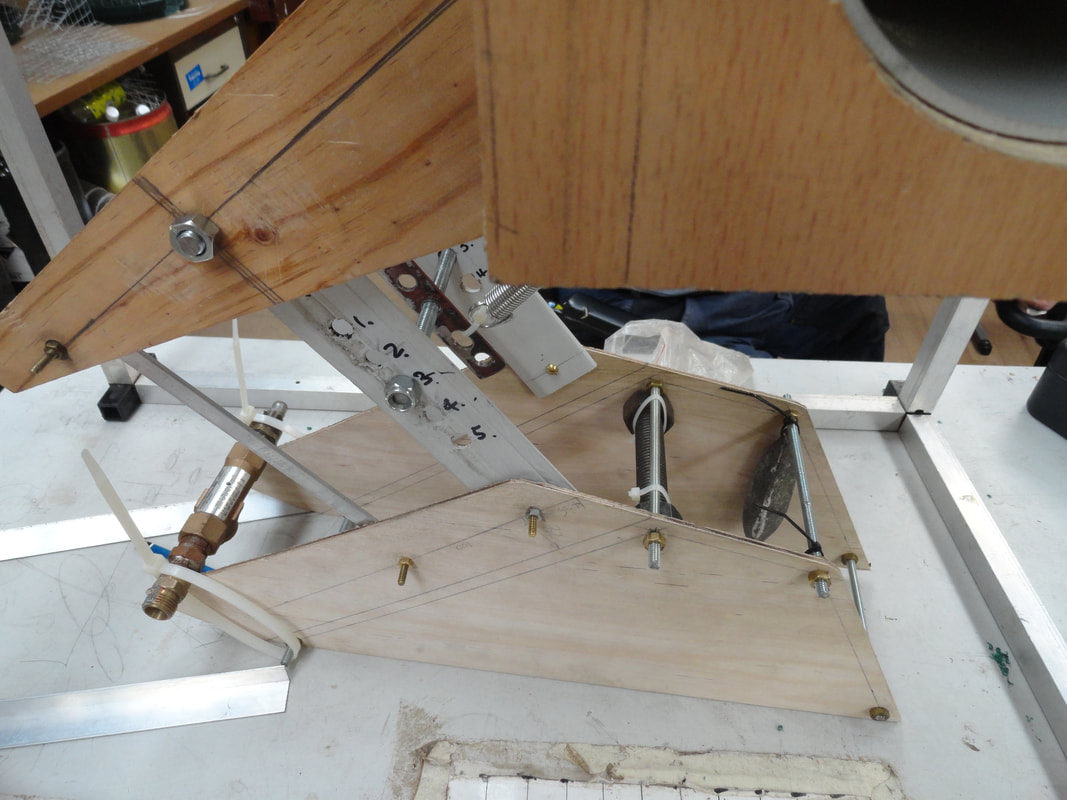
The feather wheels are part of the aluminium fence kits we purchased with the sander.
The Function of the 'Velcro' Material in this Application.
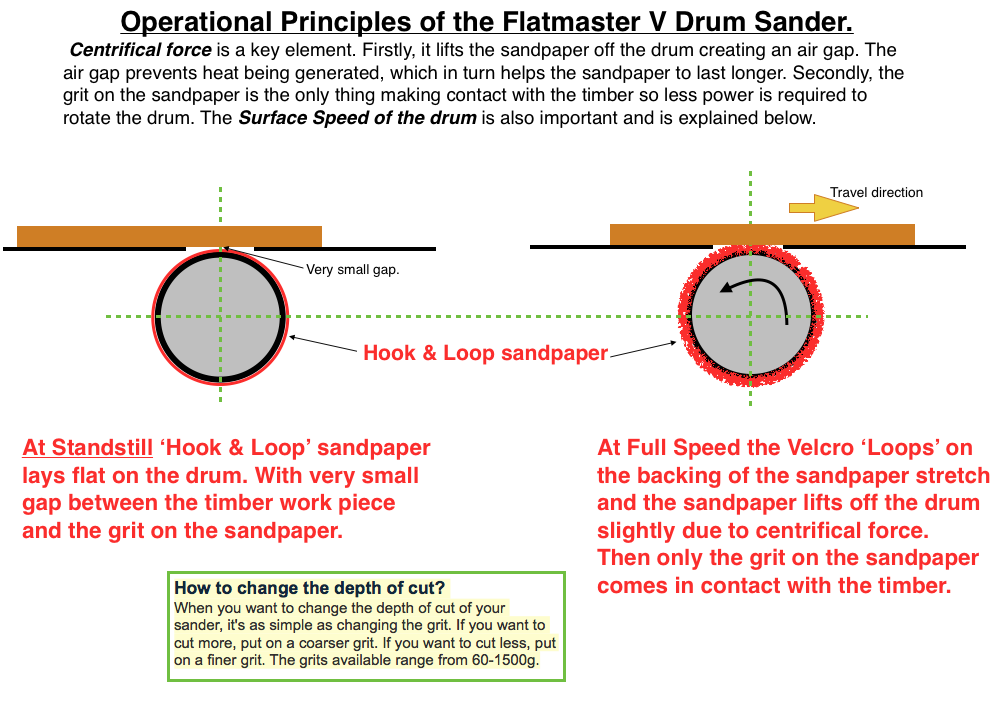
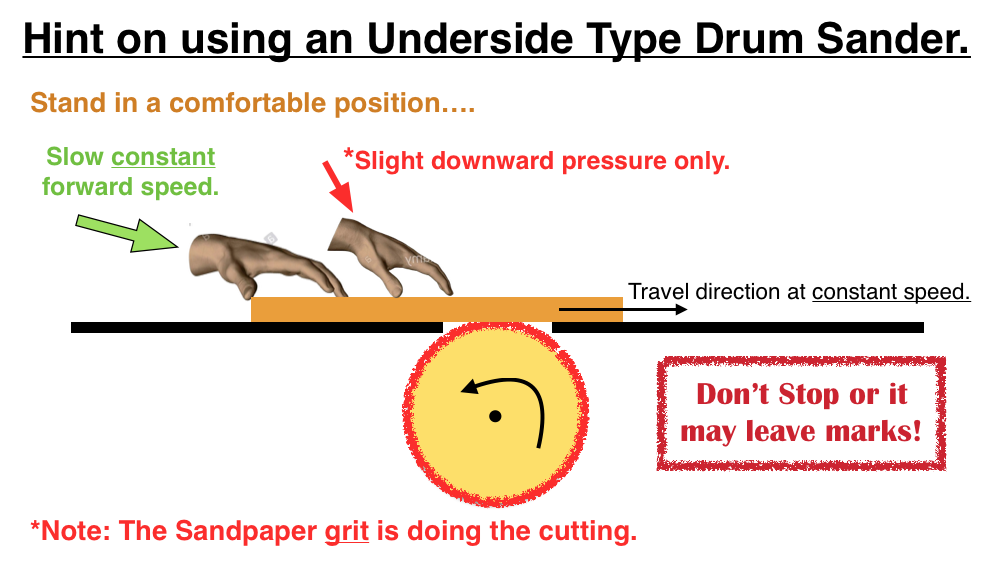
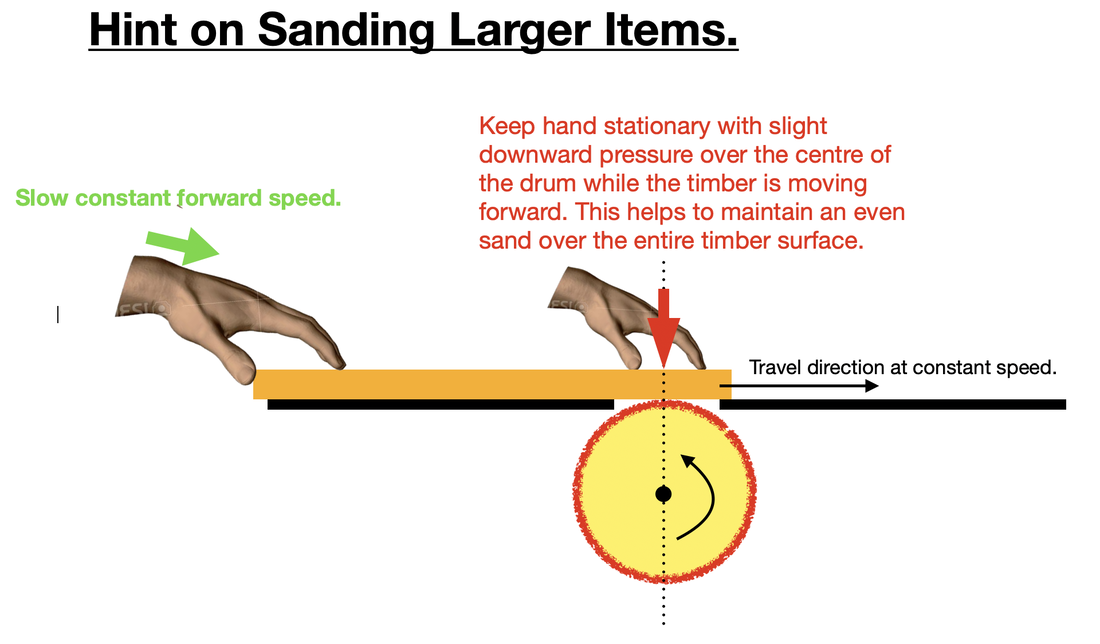
Centrifical Force created by the rotating Velcro 'Loop' Backed Sandpaper lifts it and the loops stretch allowing only the grit on the sandpaper to come in contact with the underside of the timber. The 'Hook' section of the Velcro remains fixed to the surface of the rotating drum and hooks into the stretching loops.
Below is 'Hook & Loop Velcro' under a microscope....
Below is 'Hook & Loop Velcro' under a microscope....

Pulley Ratio Change to Compensate for the Standard Frequency Difference (60Hz to 50Hz).


When initially setting up the sander it is important to check and adjust the flatness of the sander's sheet steel top. The video below shows how to do this.


How to Adjust the Depth of Cut on a Flatmaster Drum Sander....not what you might expect!
Hook & Loop Backed Sandpaper.
The Flatmaster drum sander came with a layer of P220 grit sandpaper on the drum. It and the two rolls supplied were 76mm wide but this width is not readily available in Australia. 70mm wide is readily available in a wide range of grits and roll lengths from 'The Sandpaper Man' in Queensland. 70mm wide rolls will work on the Flatmaster.
Grits available: P40; P80; P120; P150; P180; P240; P320; P400; P600.
Grits available: P40; P80; P120; P150; P180; P240; P320; P400; P600.
The Sandpaper Man - stock...
Wide range of Hook & Loop Rolls featuring Swiss brand siaspeed siafast. This product is very versatile and is suitable for use on sanding boards and drum sanders with hook and loop face. A range of grits in both 70 mm wide and 115 mm wide variations are available.
The 70 mm width can be purchased in rolls of 5 metres and 50 metres.
The 40-80 grit range feature a performance-enhancing grit mix of aluminium oxide with ceramic, while the finer grits of 100-600 are aluminium oxide and provide minimal clogging. Both can also be used when sanding metals...click on button 'Various types of Abrasive Grains or Grits' below to see uses.
General Information on Sandpaper: There are two grading scales - CAM & FEDA. From the table below you can see that P220, P240 & CAMI 220 & 240 sandpapers all have very similar grit sizes. Note: The variation in grit size is greater in the 'finishing' or high number(>240) grades of sandpapers when comparing the FEPA(P-scale) with the CAMI grading scale.
e.g. P400 = CAMI 320; P800 = CAMI 400.
e.g. P400 = CAMI 320; P800 = CAMI 400.

Details on Cutting the Sandpaper Angles.
Because we have a large number of members using the sander a drawing has been produced so that a quantity of pre-cut sandpaper wraps are available and labelled with the grit size.

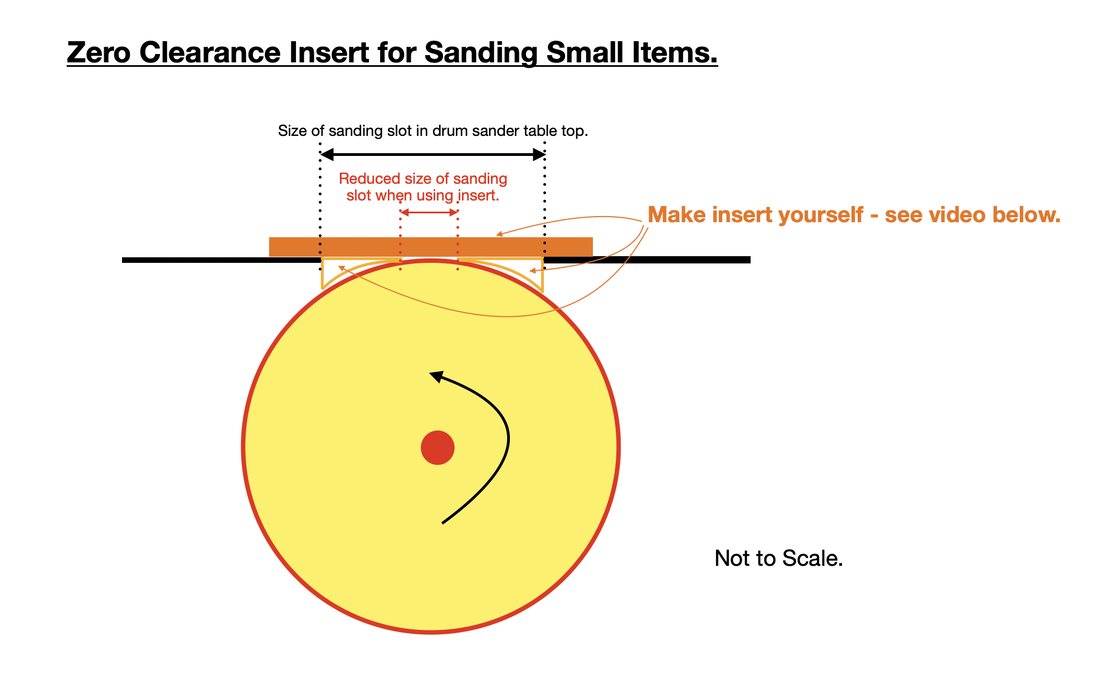
Sanding Small Items.
Advantages of an Underside Drum Sander like the Flatmaster:
- It will sand most timber flat that has a twist or warp.
- Sands from the bottom up instead of the top down therefore eliminating sanding through the sawdust that has already been removed.
- Does not create static, therefore eliminating saw dust remaining on the wood, leaving a clean surface.
- Other type sanders rely on the operator deciding on the correct pressure to exert on the piece of timber or on the back of the sandpaper via a pad, plate or drum.
- With the sandpaper lifting off the drum this creates an air gap which results in cooler sanding.
- No longer will the sandpaper clog up when sanding paint, varnish or glue. This also includes resinous woods like maple, cherry or pine.
- Easy to operate.
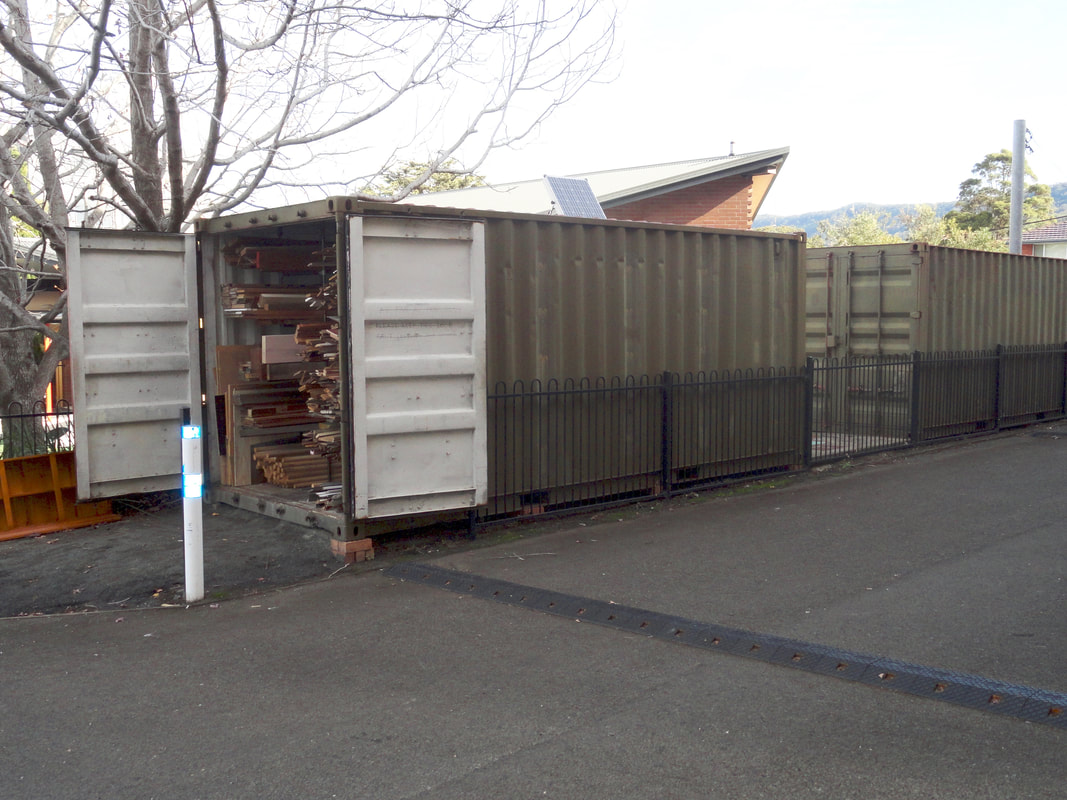
5. Automatic LED Lighting System for a Shipping Storage Container.
June 2019.
We have a 6 metre(20 foot) Shipping Container for storing our timber and metal. There is no 240 volt AC power in the vicinity so we have installed an automatic solar powered LED lighting system.
See diagrams below...
See diagrams below...
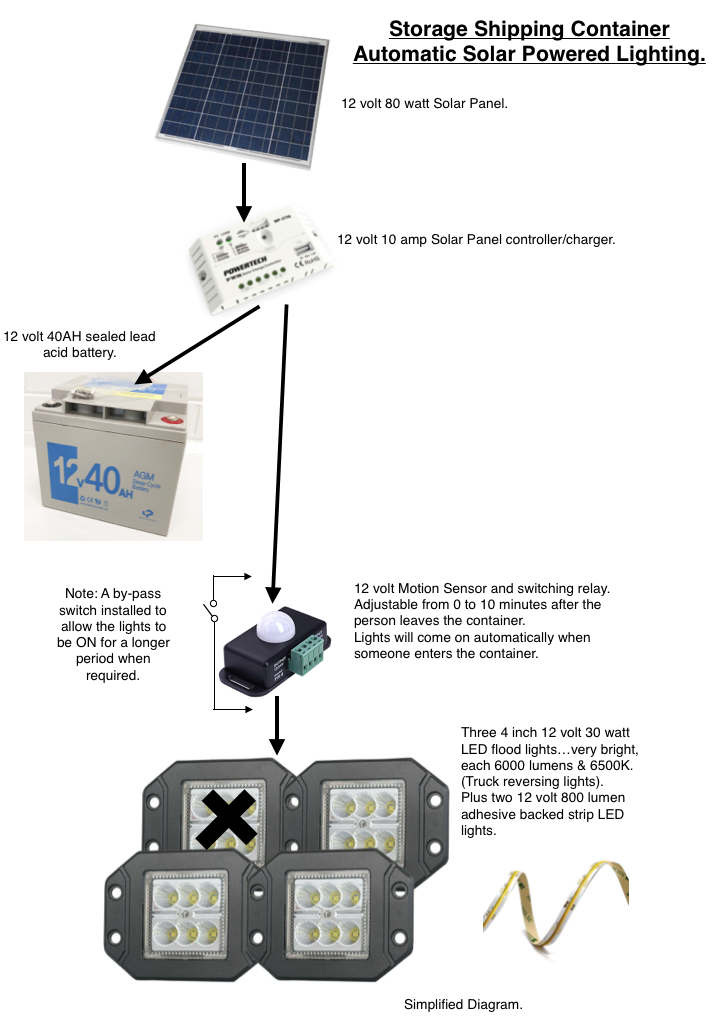

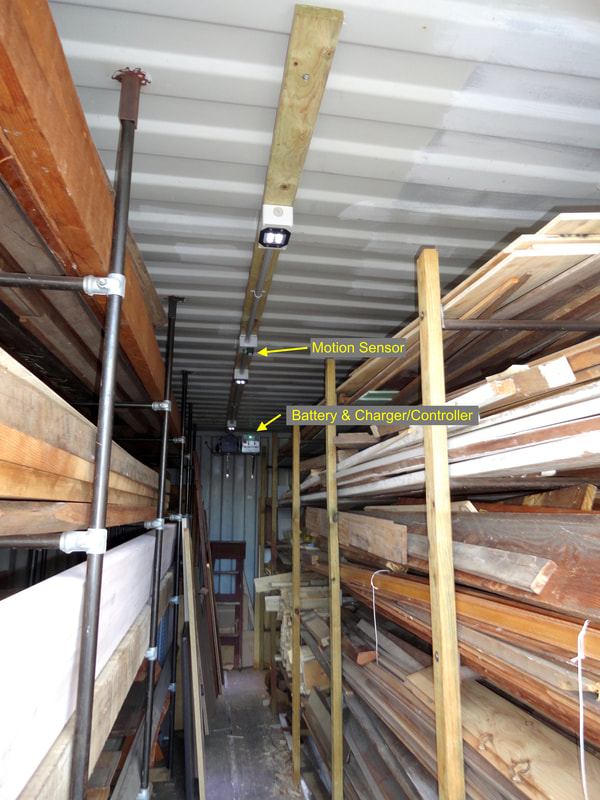
Note: The Solar panel is in shadow most of the day especially in winter due to high rise housing on the north side. From tests the solar panel still charges at about 50% in shadow. Our Shed operates four days per week 9am to 3pm. The amount of visits per shift to the container is about ten.
So there is ample daylight time available for the battery to fully charge.
So there is ample daylight time available for the battery to fully charge.
General Information:
Lead Acid Battery Types...
Lead Acid Battery Types...

Click on the buttons below for details...
General Information on Solar Power:
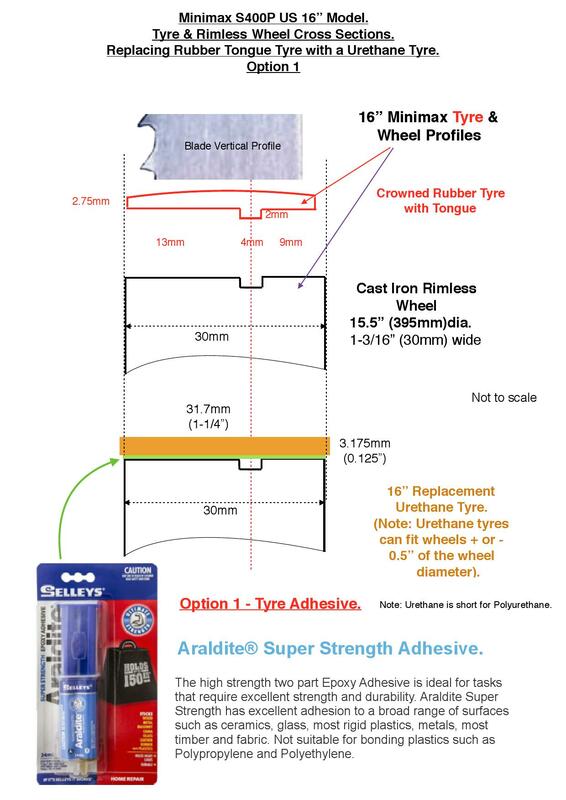
6. Minimax 16" Bandsaw - Tyre Replacement.
March 2019.
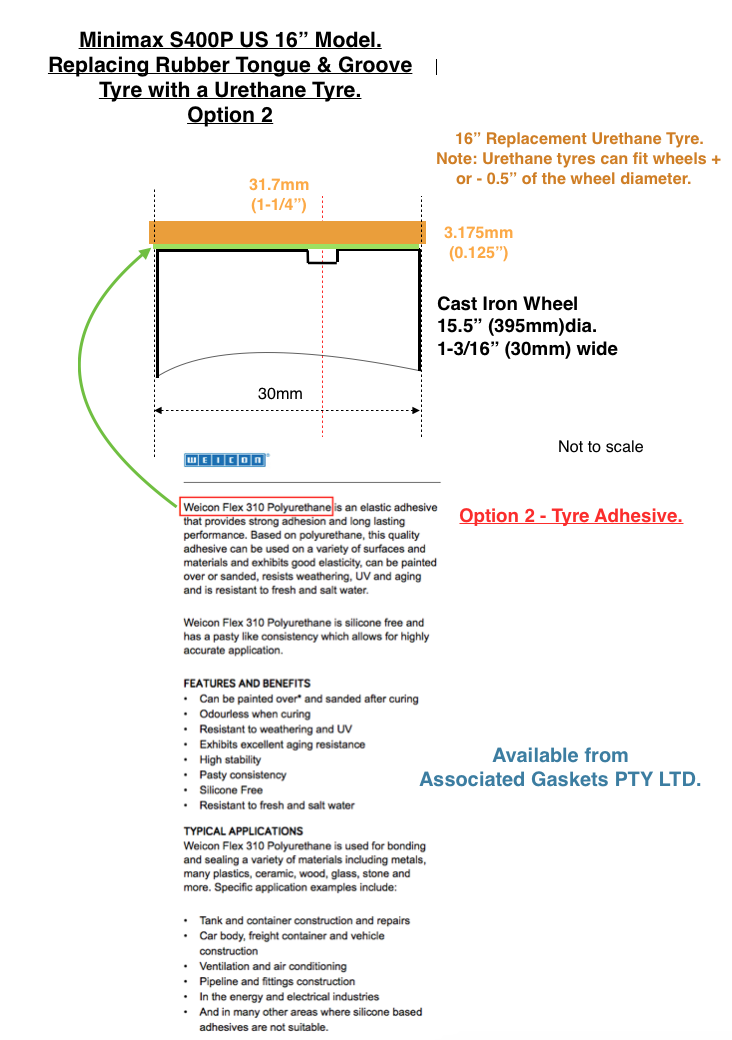
We needed to replace the rubber tyres on our Minimax 16" S400P US Bandsaw. The direct replacements had to come from Italy so we decided to use Urethane tyres from 'The WoodKid' Company in Victoria (they obtain them from Sulphur Grove Tools in USA). Urethane tyres are supplied to suit 12";14";16";18" etc. diameter wheels. Actually 16" Minimax bandsaws have a wheel diameter of 15.5". We purchased a pair of 16" urethanes which fit a wheel 16" +or- 0.5". When we fitted the tyres they were found to be a little loose on the wheels. We then investigated adhesives that are suitable for gluing Polyurethane (Urethane for short) to machined cast iron/steel surfaces. Two were found....details below.
We used option 1.
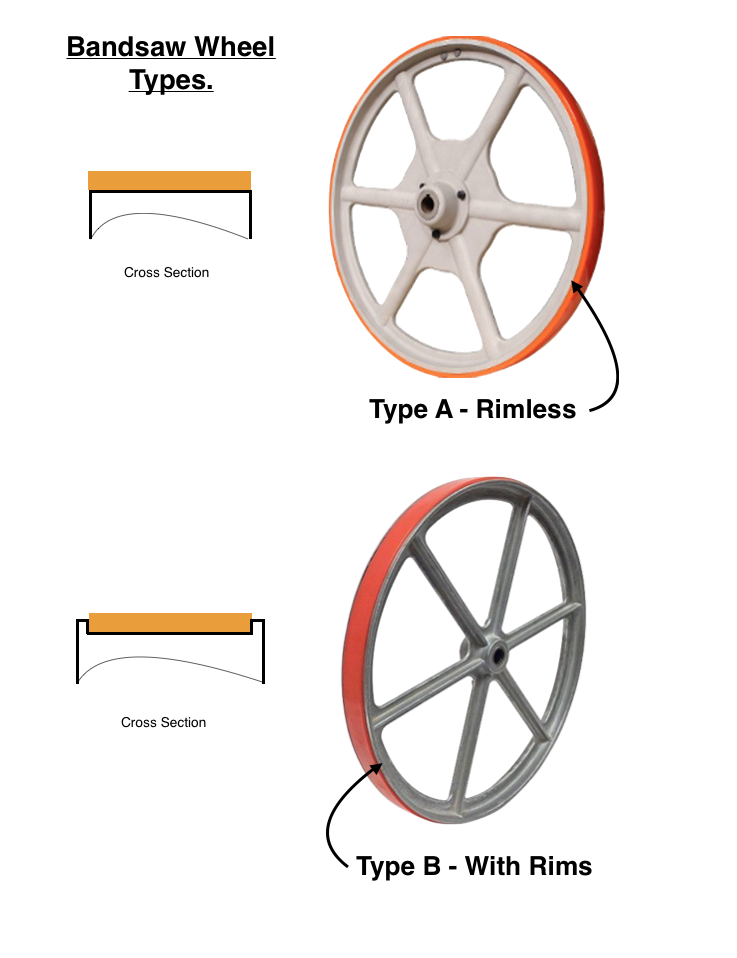
Minimax bandsaw rimless wheels are a little different to most and use a 'tongue & groove' rubber tyre...see diagrams below.
We used option 1.
Minimax bandsaw rimless wheels are a little different to most and use a 'tongue & groove' rubber tyre...see diagrams below.
Blade Guides Upgrade.
November 2020.
The 16" Minimax SP400P Bandsaw is fitted with European Style Guides. We found that the bottom guide rear thrust bearing was damaged on several occasions...see photos of the damaged bearing below.
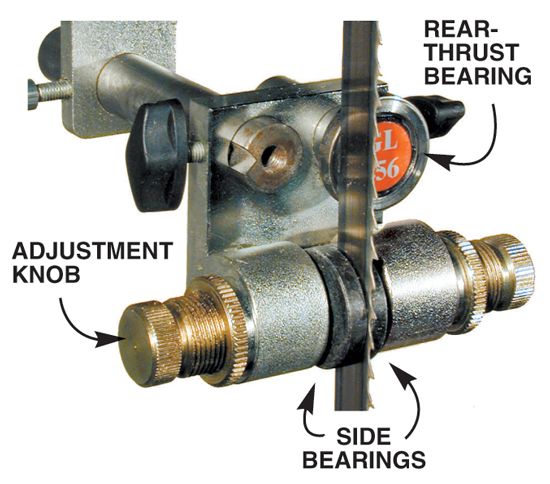
Example of a Typical European Style Top Guide. Ceramic guide pads are used on the sides of the blade.
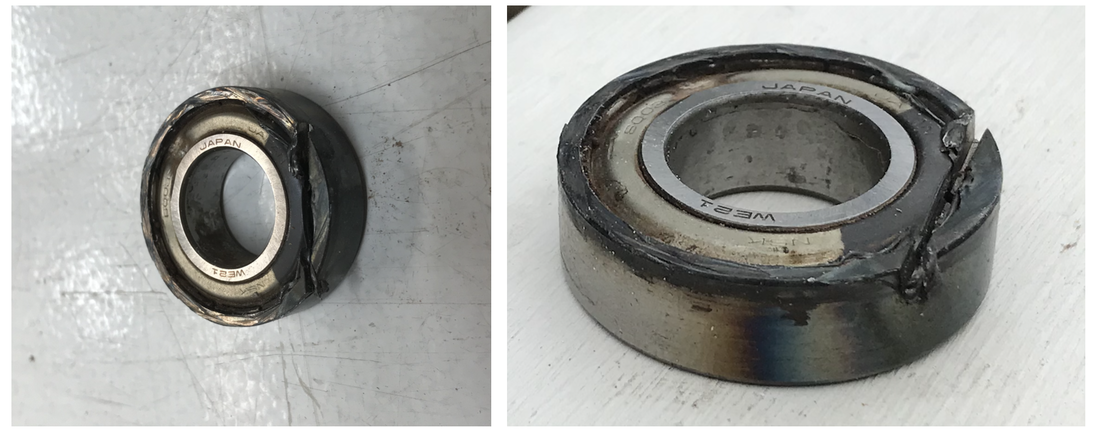
Damaged Guide Rear Thrust Bearing.
Another example where the side of the rear thrust bearing makes contact with the back of the blade.
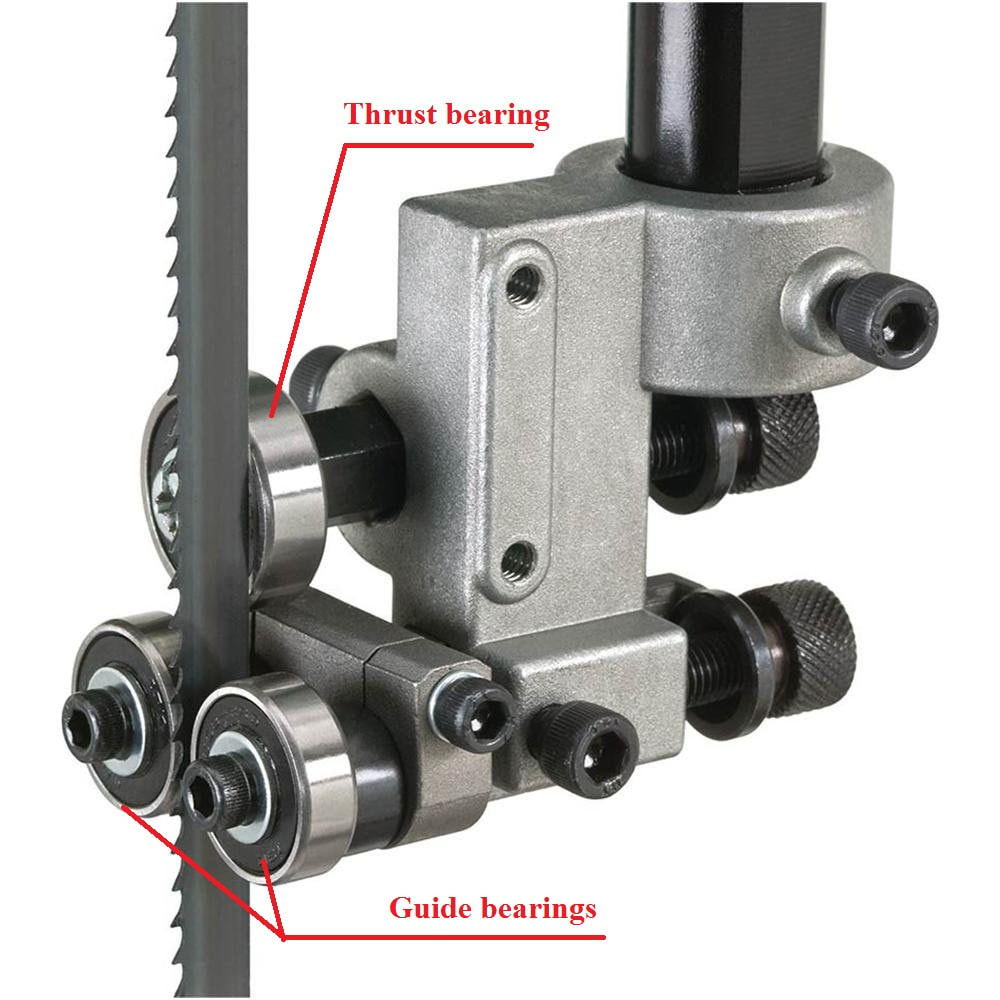
So we decided to upgrade the guides to Carter Products Euro 5 Kit fitted with 528 extra wide dual side bearing kits. Also fitted with an extra long slotted arm on the lower guide assembly.
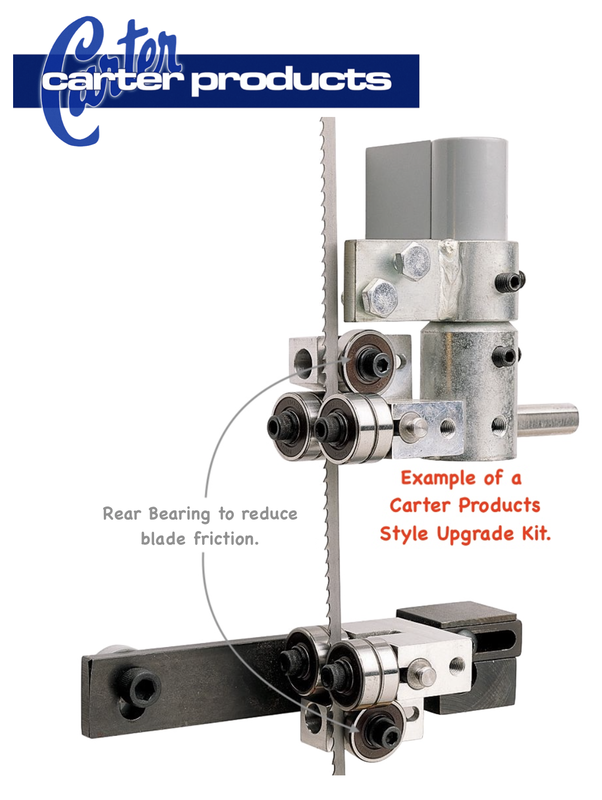
Rear bearing tyre also has a groove to support the blade...see photo below.
Note: The two guides are not setup correctly. The blade's teeth should be forward of the guide bearings.
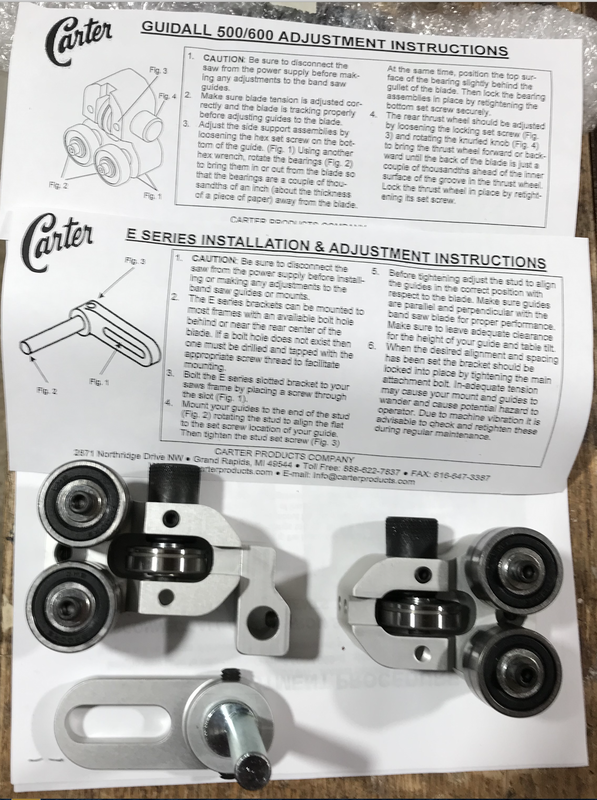
Carter Products Euro 5 Assembly Kit.
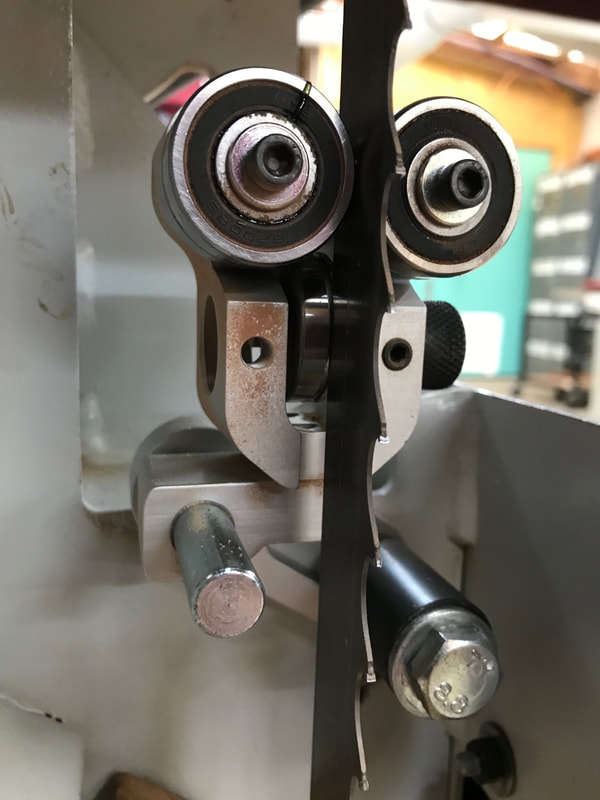
Our bottom Carter Guide installed
7. Shed Members' Insurance - Electrical Work.
Attention Shed members who have an electrician's licence and do electrical work on a voluntary basis for their Shed. The AMSA Group Insurance Program is with the Everest Risk Group Insurance Brokers. This program does not have Public and Products Liability cover for that work which requires a licence (e.g. Electrician). There is a 'Frequently Asked Questions' guide on the AMSA website...click on the button further down the page to view.
This is #41 from the FAQs...
41. I am a licenced tradesperson, am I covered by The Insurance?
Where you are performing work reliant upon your licencing as a tradesperson, therefore, statutory regulation applying, the policy would not extend to cover you for these works.
In this instance, you would be required to hold your own insurance cover and supply AMSA or it’s Shed a copy of the Public & Products Liability and Workcover insurance certificate noting your ABN for works completed.
Everest Risk Group Insurance Brokers can arrange a seperate policy for Public and Products Liability Insurance cover. This policy is taken out by the Shed.
Definitions:
Public Liability Insurance protects you against legal liability arising out of property damage or personal injury to a third party as a result of your work.
Products Liability insurance is designed to protect you from claims of injury or damage arising from work you've done.
8. 3 in 1 Sheet Metal Folder, Guillotine & Rolls.
Hare & Forbes Model CM-1000.
June 2018
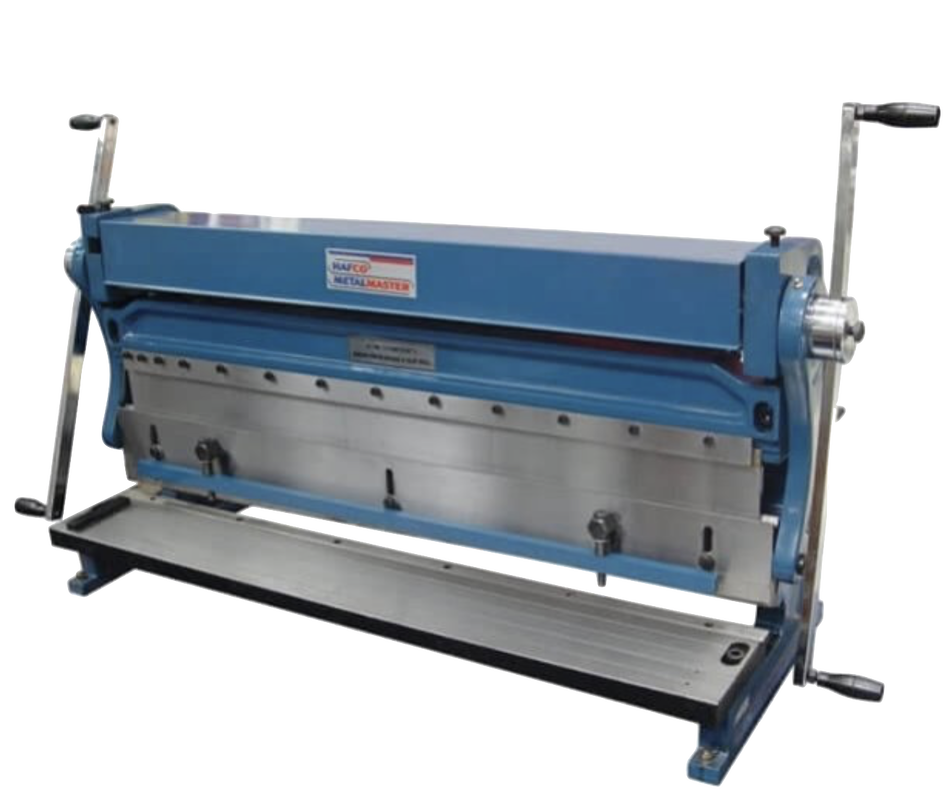
Hare & Forbes CM-1000
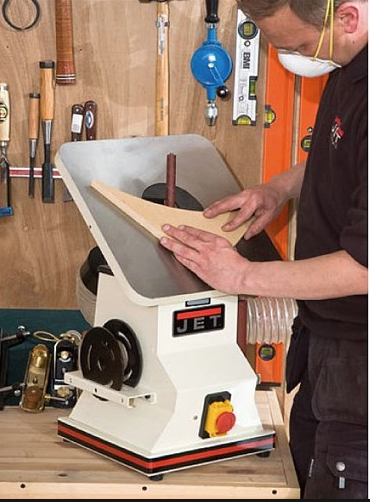
9. Jet Oscillating Spindle Sander
Model JBOS-5.
June 2018.
We have replaced our Spindle/Bobbin Sander with a Jet bench top model JBOS-5. The previous machine only had one spindle and the constant changing of bobbins stretched the spindle's 8mm thread. The spindle shared the same shaft with the motor armature...see photo below. Large cost and more difficult to change.
We have replaced our Spindle/Bobbin Sander with a Jet bench top model JBOS-5. The previous machine only had one spindle and the constant changing of bobbins stretched the spindle's 8mm thread. The spindle shared the same shaft with the motor armature...see photo below. Large cost and more difficult to change.
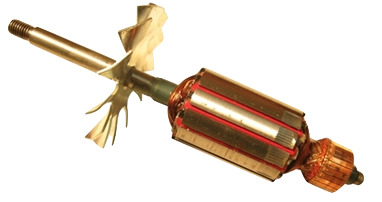
Spindle and motor armature share common shaft.
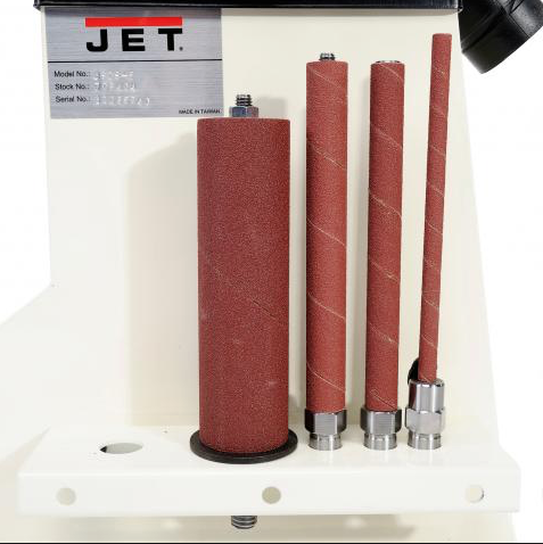
Jet Bench Top Spindle/Bobbin Sander Model JBOS-5:

Five Changeable Spindles:
10. JessEm Router Package.
November 2017.
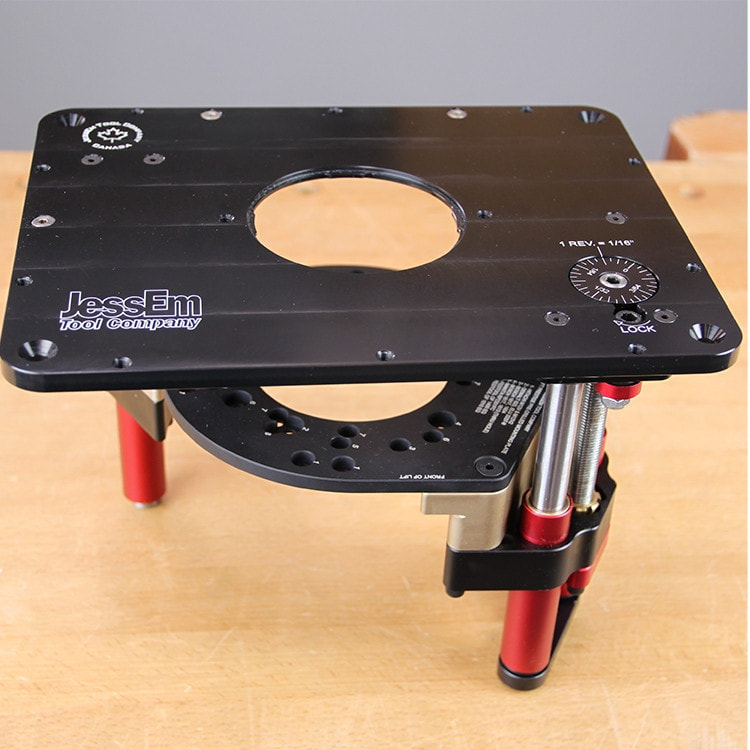
Having to kneel and work in the dark to change router bits and make adjustments has led us to upgrading our router work station. We wanted a router table that eliminated these problems and allow all adjustments to be made from above. The JessEm Mast-R-Lift II package below has achieved this.
Having to kneel and work in the dark to change router bits and make adjustments has led us to upgrading our router work station. We wanted a router table that eliminated these problems and allow all adjustments to be made from above. The JessEm Mast-R-Lift II package below has achieved this.
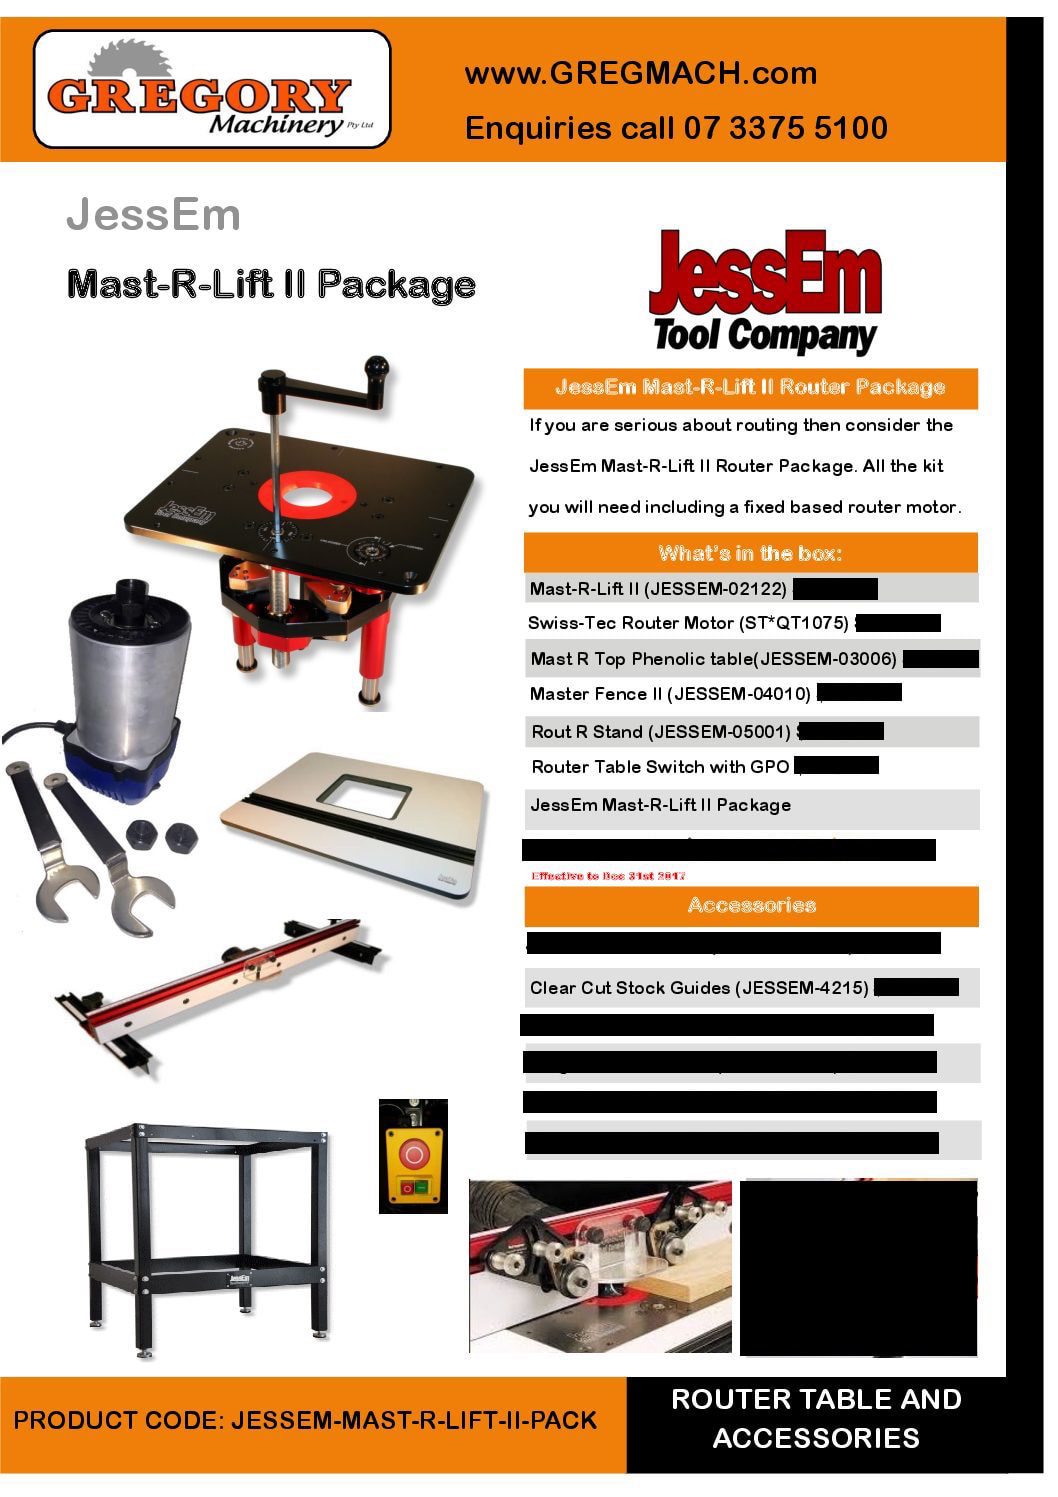
Click on the buttons to watch the various JessEm videos...
September 2020.
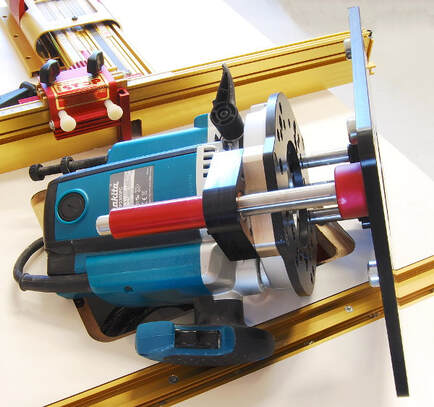
We decided to change to the JessEm Rout-R-Lift Prestige – Metric Version. This unit accommodates Fixed & Plunge Base Routers which are more readily available in Australia than the round body type routers common on the North American market. The unit was purchased from Gregory Machinery in Queensland.
It fitted directly into the existing JessEm phenolic table top.
It fitted directly into the existing JessEm phenolic table top.
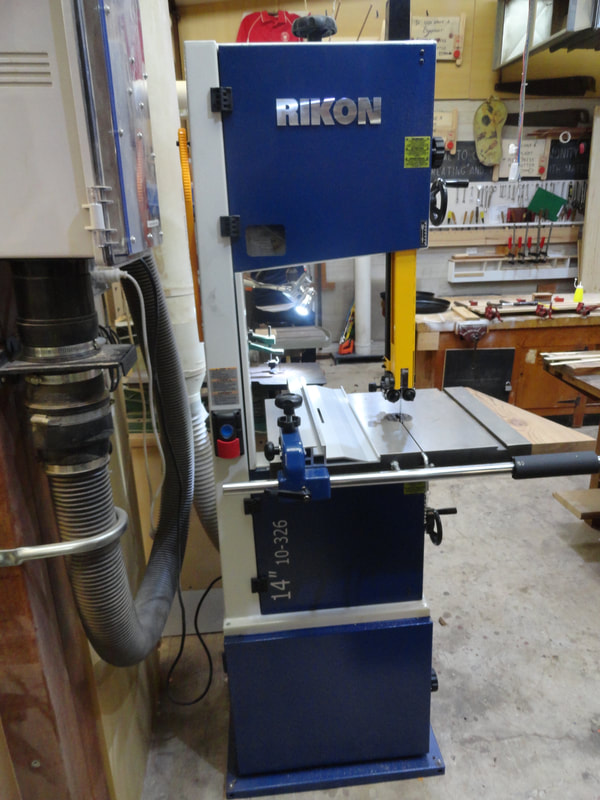
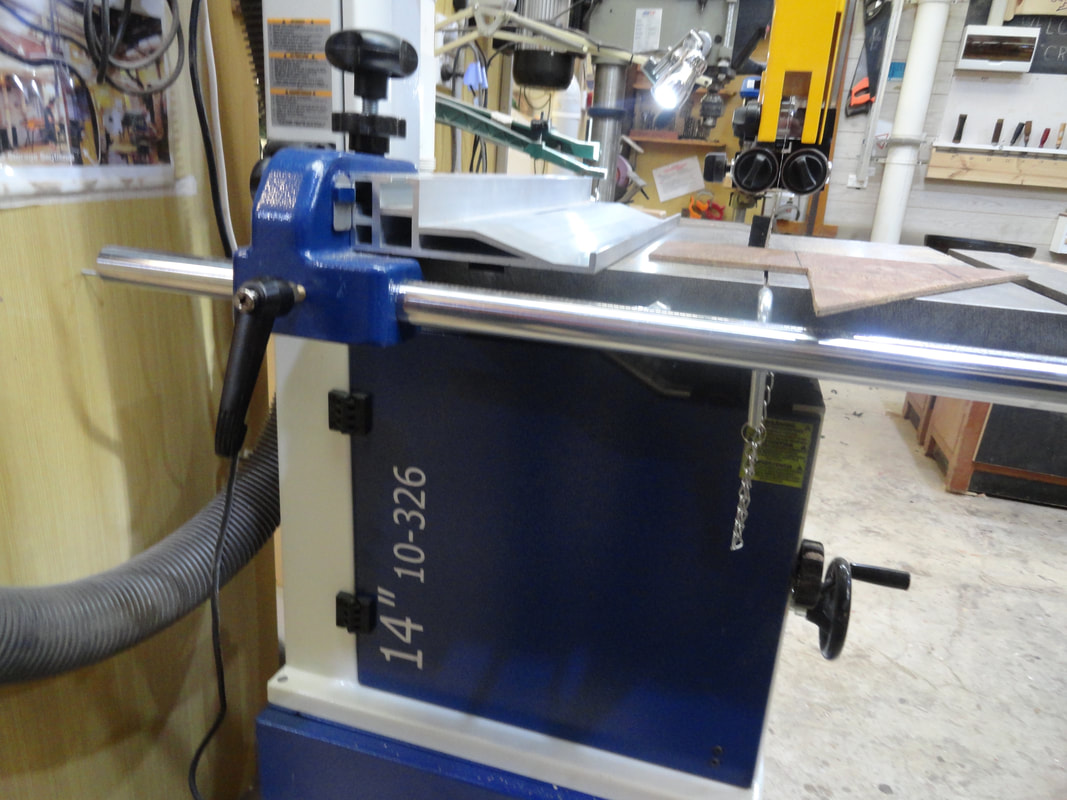
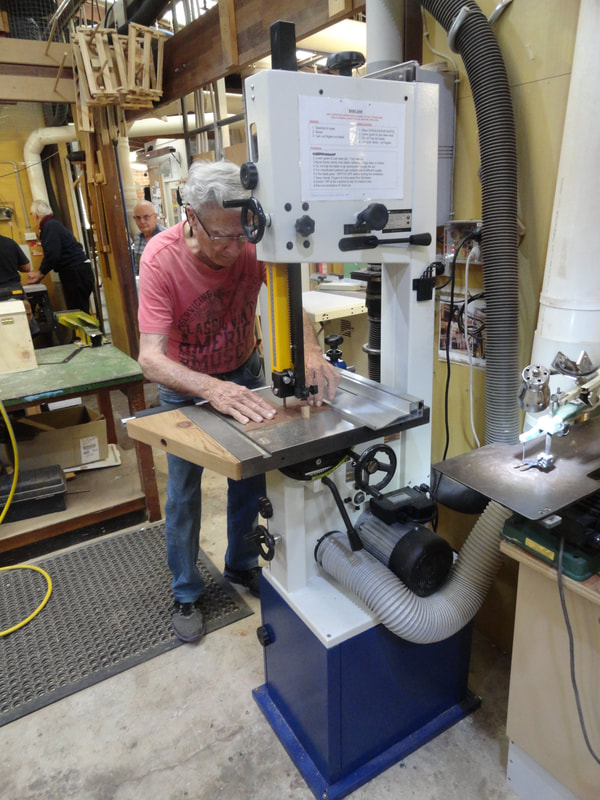
11. Rikon 14" Model 10-326 Bandsaw.
October 2017.
We purchased a new bandsaw from Total Tools with some great features. It is well suited for our needs. Click on button below to view video...
We purchased a new bandsaw from Total Tools with some great features. It is well suited for our needs. Click on button below to view video...

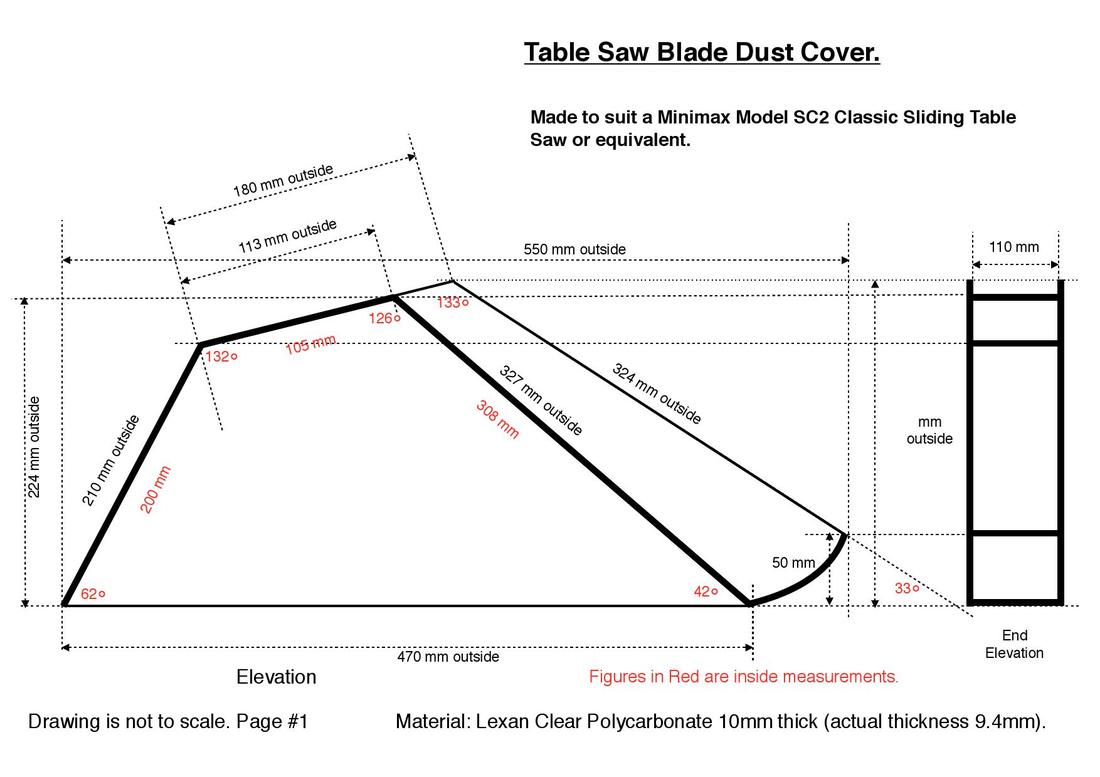
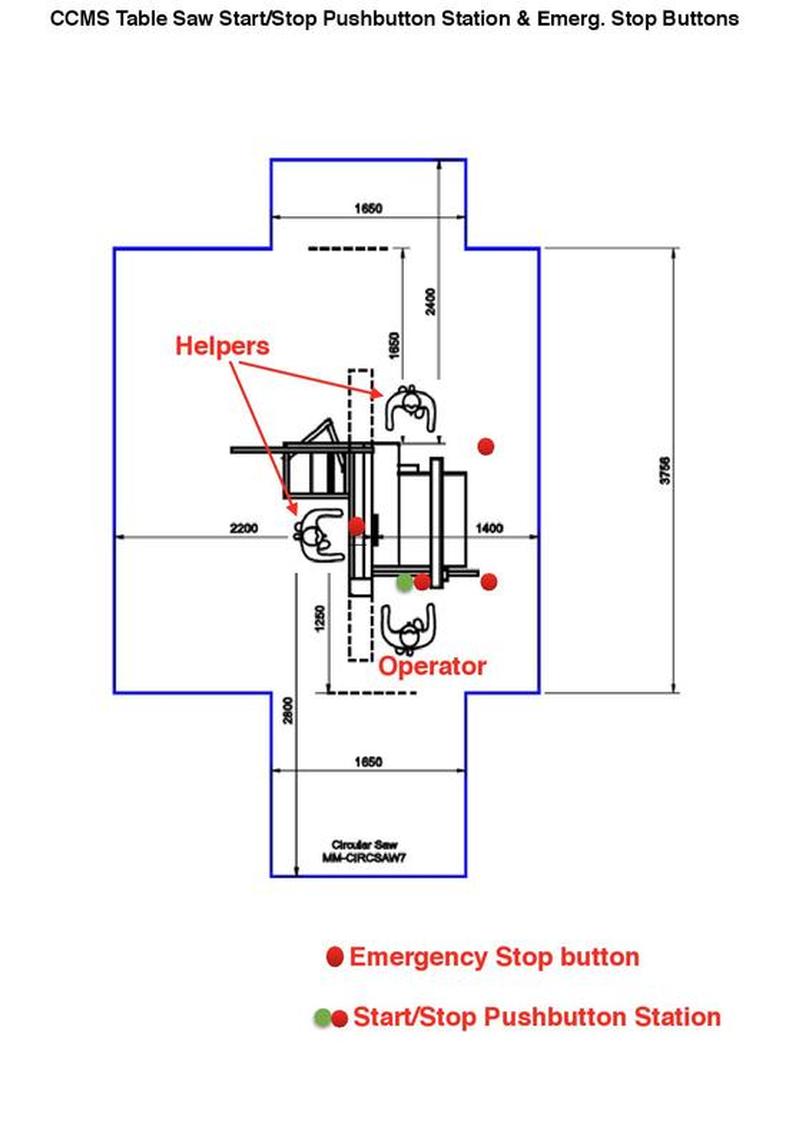
12. Table Saw Blade Guard.
February 2017.
We were not happy with the blade guard supplied with our table saw and our members were reluctant to use it so we came up with our own design.
A combination of certain features from various guards resulted in the development of our particular guard.
Some of the features required:
We were not happy with the blade guard supplied with our table saw and our members were reluctant to use it so we came up with our own design.
A combination of certain features from various guards resulted in the development of our particular guard.
Some of the features required:
- Good vision of the blade.
- Improved dust collection with-in the guard.
- The ability to easily move it out of the way for 'special cuts'.
- Overall ease of use with Shed members approval.
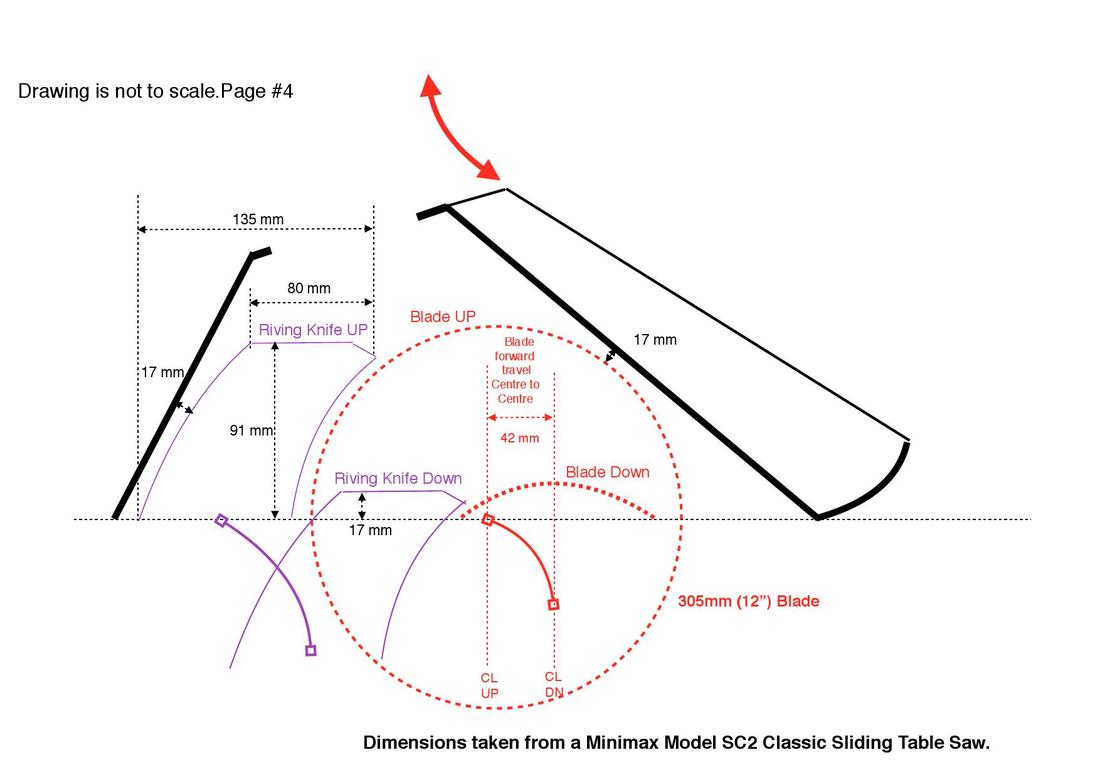
Note:The front of guard has a curved skid 50mm high. The guard can be lifted slightly to a 'stay put' position(counterbalanced with spring tension) so that it can still ride on >50mm thick timber.
Before (as supplied)
|
Now
|
The saw's Start/Stop Pushbutton station was relocated onto the saw. Additional lockout emergency stop buttons were installed on the wall nearby for those instances where the normal stop button is covered up...such as when cutting large sheets.
The air flowing through the guard is controlled using a combination of 10mm dia. holes drilled in the side of the guard and a 100mm variable throttle valve in the flexible DC hose...see photos above. This fine control of the air flow stops thinner timber sheets from being sucked up off the saw's table and sticking to the bottom of the guard.
A 50 watt 3,100 lumen LED flood light has been installed over the table saw.
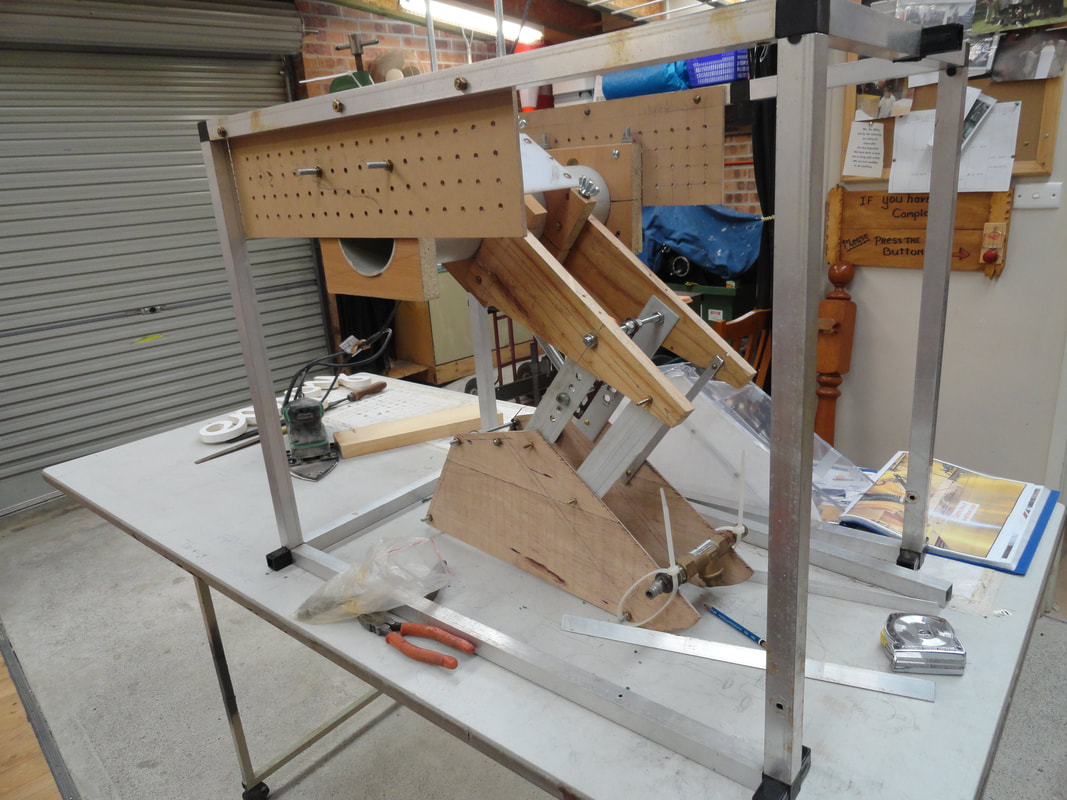
Full Scale Model
13. Variable Frequency Drives.
VFD Basics:
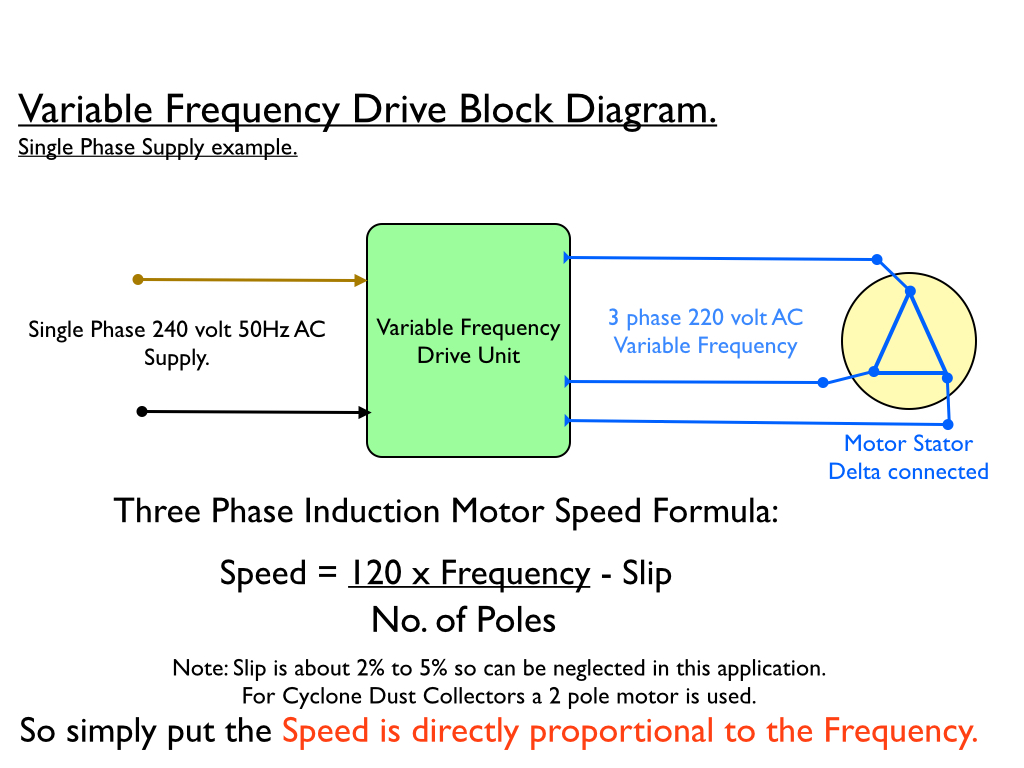
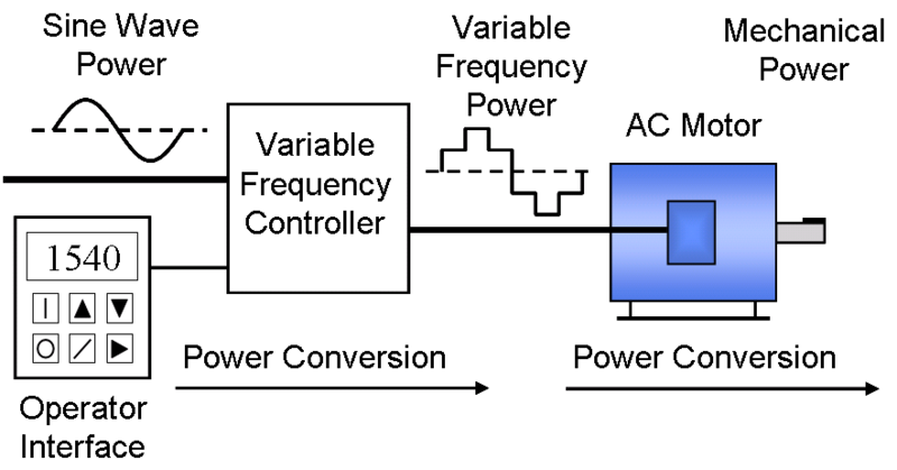
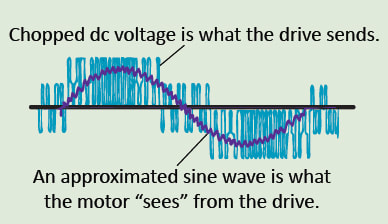
'Drive' = 'Controller' in the above diagrams.
Click on the button below to get a better understanding of Variable Frequency Drives...
Generally in Australia 3 phase AC Induction motors are supplied connected in Star for use on a 3 phase 415 volt 50 Hz supply.
If the VF drive unit is a model that requires a single phase 240 volt 50 Hz supply then the motor stator has to be connected in Delta configuration(as shown in the diagram below). If the VF drive unit is a model that requries a 3 phase 415 volt 50Hz supply then the motor stator has to be connected in Star configuration. See diagram below to better understand the two types of stator winding connection configurations....
If the VF drive unit is a model that requires a single phase 240 volt 50 Hz supply then the motor stator has to be connected in Delta configuration(as shown in the diagram below). If the VF drive unit is a model that requries a 3 phase 415 volt 50Hz supply then the motor stator has to be connected in Star configuration. See diagram below to better understand the two types of stator winding connection configurations....
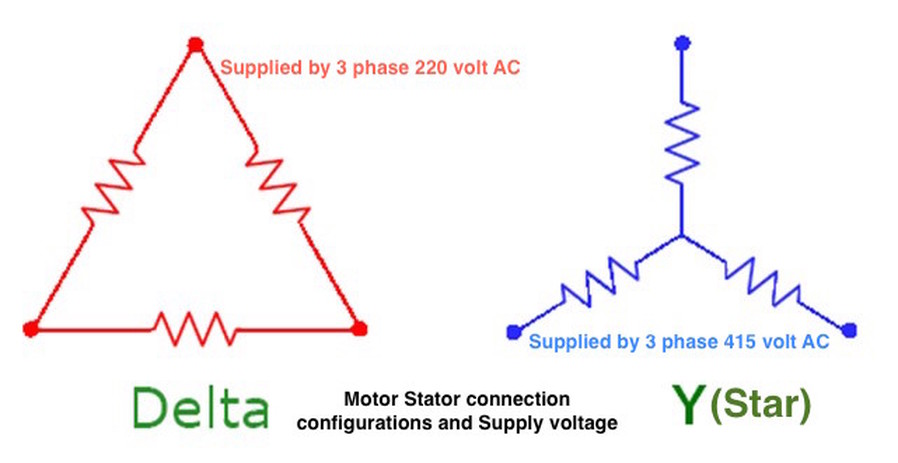

Note: With Star connection....two windings are in series with 415 volt connected across them...so each winding has about 208 volts across it...that is similar to the Delta connection which has 220 volts across each winding.
In general VFDs with single phase 240 volt input supply have a 220 volt 3 phase output while VFDs with a 3 phase 415volt input supply have a 440 volt 3 phase output. With a 50 Hz input frequency and variable frequency output.....in Australia.
In general VFDs with single phase 240 volt input supply have a 220 volt 3 phase output while VFDs with a 3 phase 415volt input supply have a 440 volt 3 phase output. With a 50 Hz input frequency and variable frequency output.....in Australia.
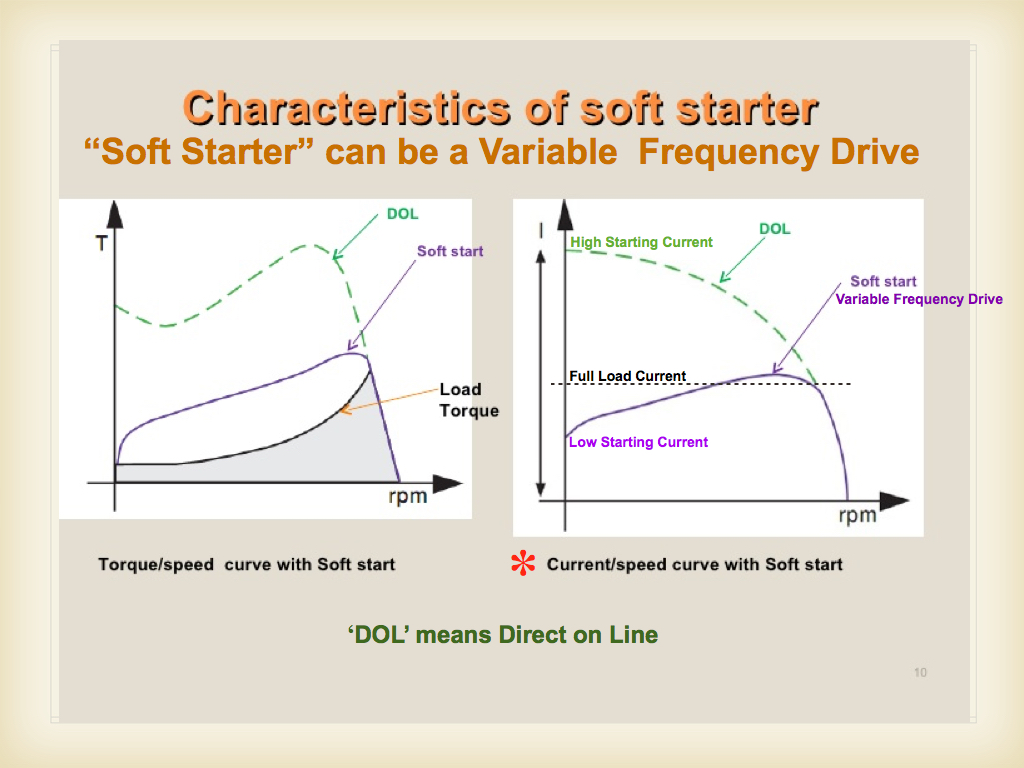
Soft Start.
To explain 'soft start' the important graph is the right hand "Current/Speed" graph below. You can see that the DOL starting current (green curve) can be greater than twice the full load current at start. Thus this limits the size (KW - power) motor you can use. But by using a Variable Frequency Drive unit larger power motors can be started - see purple curve....lower starting current. This is why it is called a "Soft Starter".
To explain 'soft start' the important graph is the right hand "Current/Speed" graph below. You can see that the DOL starting current (green curve) can be greater than twice the full load current at start. Thus this limits the size (KW - power) motor you can use. But by using a Variable Frequency Drive unit larger power motors can be started - see purple curve....lower starting current. This is why it is called a "Soft Starter".
Maximum Frequency Setting.
Thought should be put into the VFD maximum frequency setting for two reasons:
1. The induction motor manufacturers balance their motors at 60Hz and guarantee them under warranty up to 60Hz. Important when setting the Maximum Frequency on drives like Cyclone Dust Collection Systems, where you are trying to get as high a speed/suction as possible. We set our max. freq. at 60Hz and run at 57Hz(~3400RPM)....plenty of suction!.
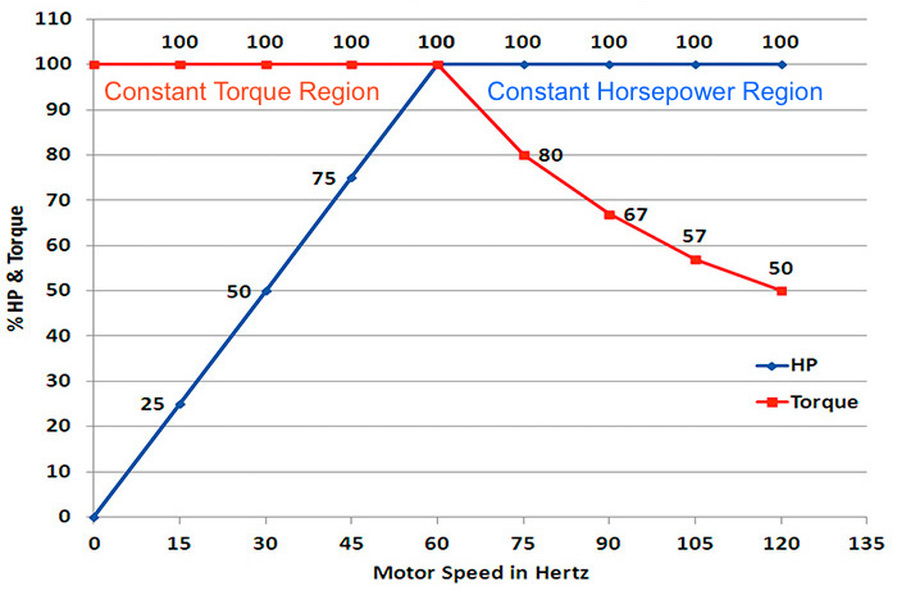
2. The output torque of the motor reduces above ~60Hz but the horsepower remains constant. See curve below...
Note: 1 Horsepower = 746 watts.
Horizontal axis is VF Drive output frequency (Hertz)....which is close to being directly proportional to the speed as discussed at the top of this page. Thus the horizontal axis is shown as "Motor Speed in Hertz".
The graph below is a theoretical no-load graph showing motor torque at 100% from start then declining above 60Hz.
Thought should be put into the VFD maximum frequency setting for two reasons:
1. The induction motor manufacturers balance their motors at 60Hz and guarantee them under warranty up to 60Hz. Important when setting the Maximum Frequency on drives like Cyclone Dust Collection Systems, where you are trying to get as high a speed/suction as possible. We set our max. freq. at 60Hz and run at 57Hz(~3400RPM)....plenty of suction!.
2. The output torque of the motor reduces above ~60Hz but the horsepower remains constant. See curve below...
Note: 1 Horsepower = 746 watts.
Horizontal axis is VF Drive output frequency (Hertz)....which is close to being directly proportional to the speed as discussed at the top of this page. Thus the horizontal axis is shown as "Motor Speed in Hertz".
The graph below is a theoretical no-load graph showing motor torque at 100% from start then declining above 60Hz.
Explanation of Torque:
Torque is defined as a twisting force that tends to cause rotation. We call the point where the object rotates the axis of rotation.
Newton's Law of Rotation....
Practical Information on using VFDs:
If you only have single phase 240 volt AC available. Then typically ~2 HP (1.5KW) single phase motor is about the limit you can 'DOL' (direct on line) start on a 10 amp 240 volt single phase circuit. This is due to the high DOL starting current (*see graph above). DOL Starting Current is usually between 5 & 7 times greater than the full load current.
Now by using a VFD with a single phase 240 volt AC input you can start up to a ~3HP (2.24KW) three phase motor....provided the VFD unit's 'current limit' is set to a value that does not let the single phase (240 volt) VFD input current exceed 10 amps. Since 10 amps is the limit of a standard powerpoint circuit.
You also may need to have a dedicated 10 amp powerpoint circuit available for the drive....or a 15 amp supply.
* The current/speed curve above shows why it is possible to go higher in HP/KW when using a VFD(Soft Start)....because of a much lower starting current.
Note: Variable Frequency Drives....there are different models for use on single phase supplies as against three phase supplies.
Variable Frequency Drives should be installed by a licensed electrician.
To change the direction of rotation of a three phase Induction motor just change two phases as per the diagram below.

July 2016.
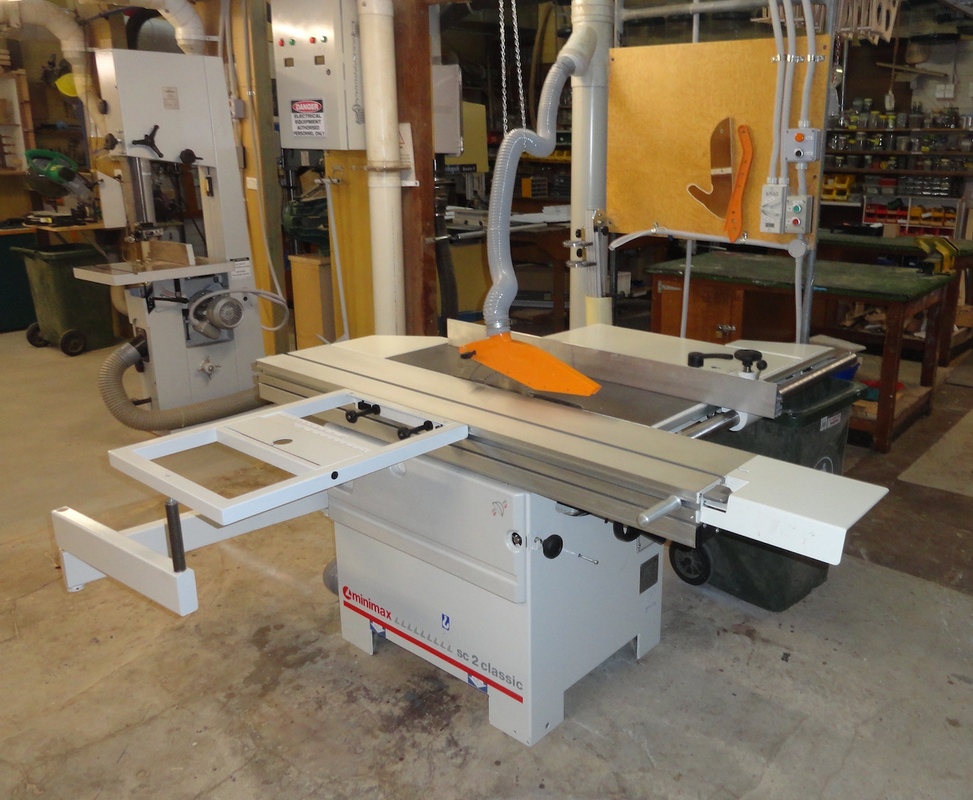
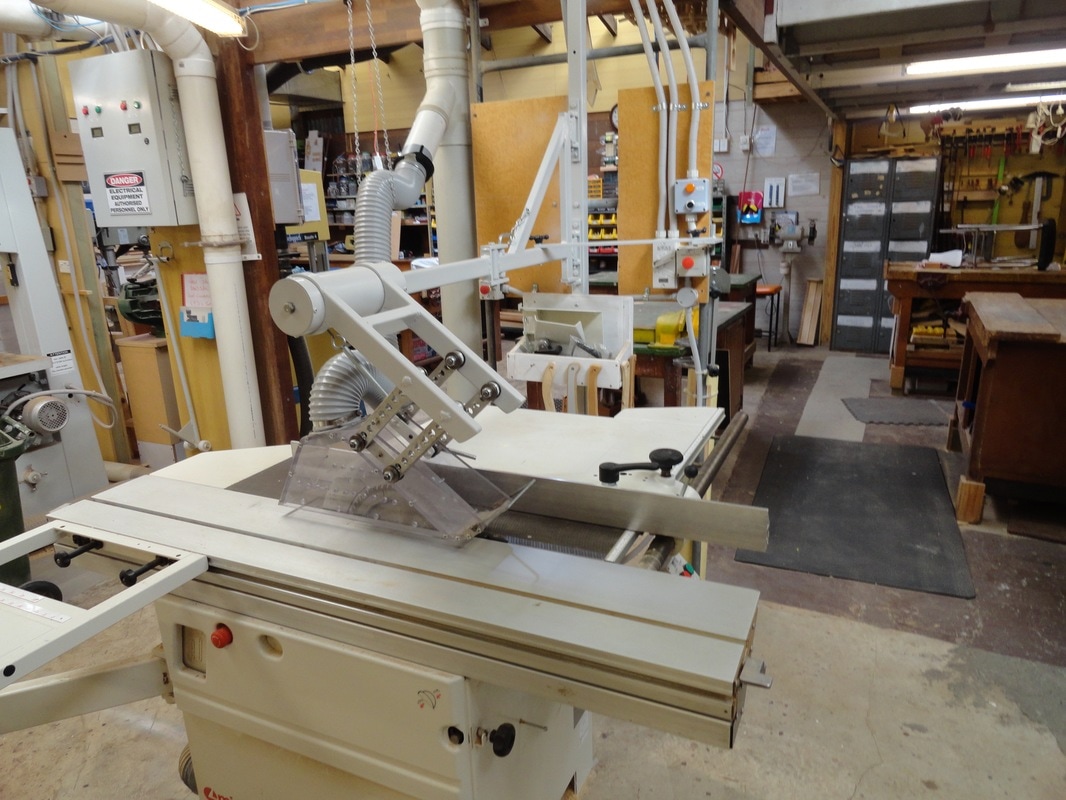
Minimax Table Saw & Minimax Bandsaw - 'Soft-Start' using Variable Frequency Drives.
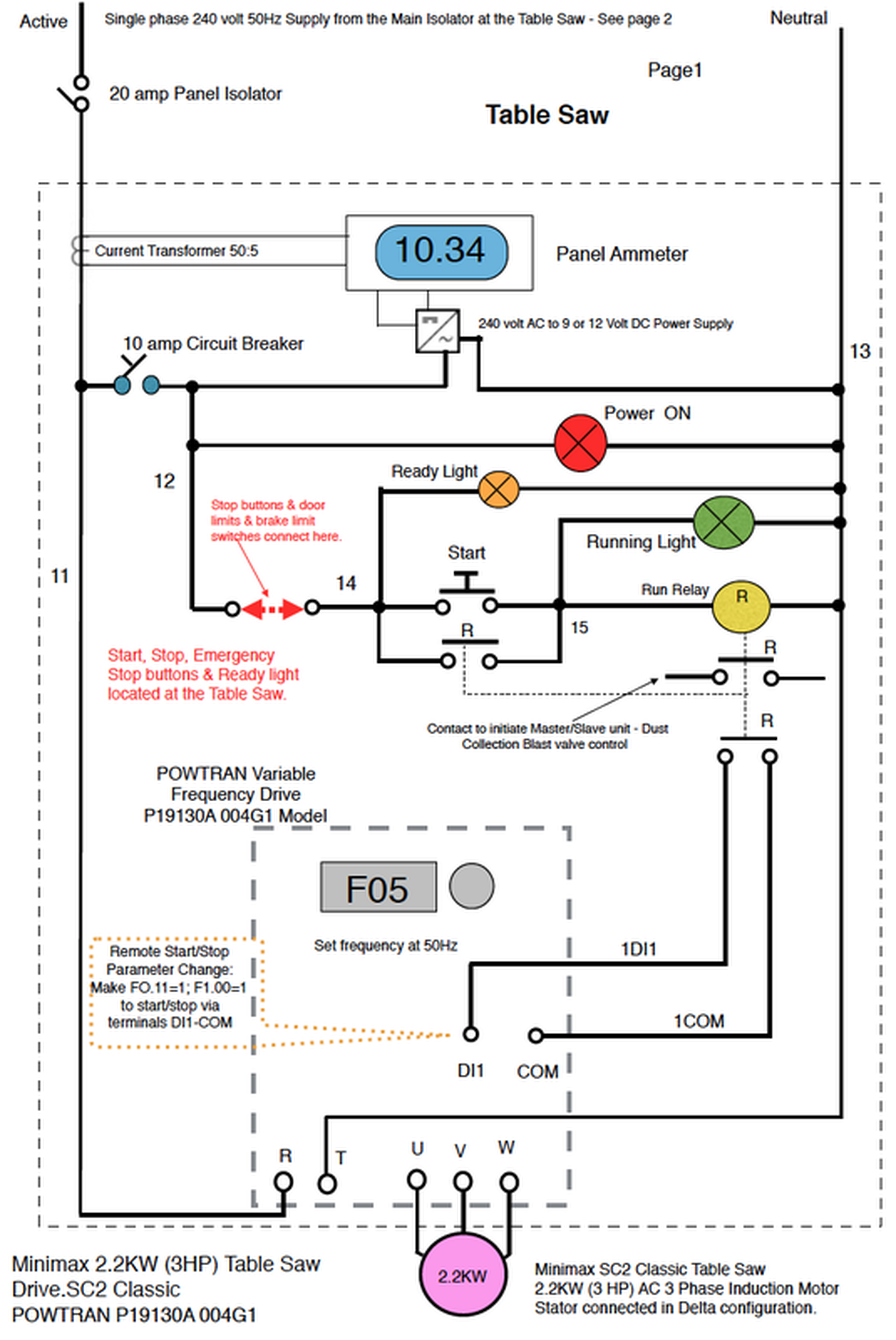
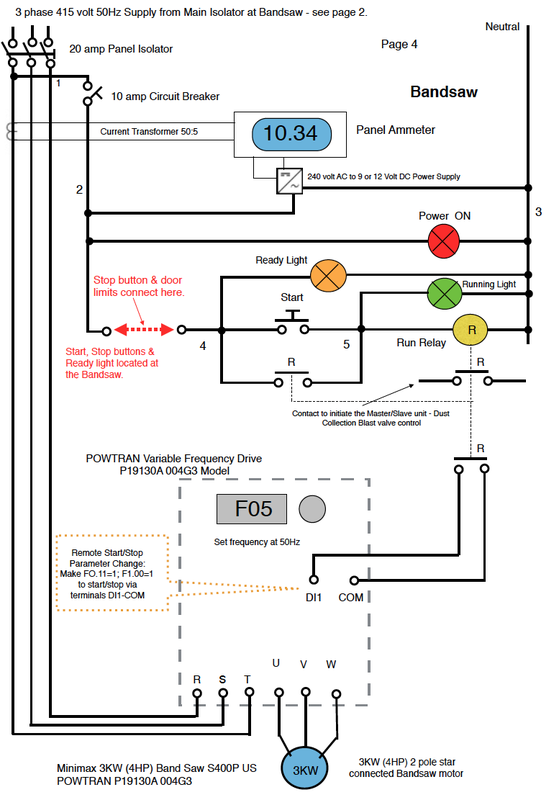
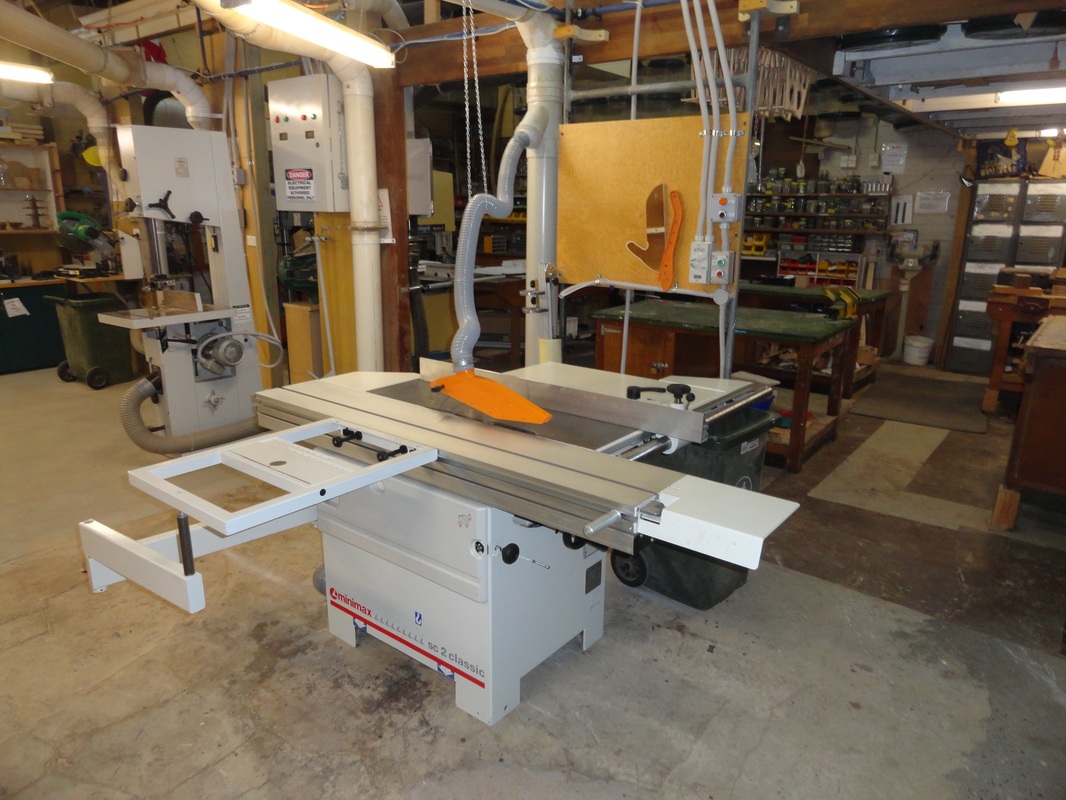
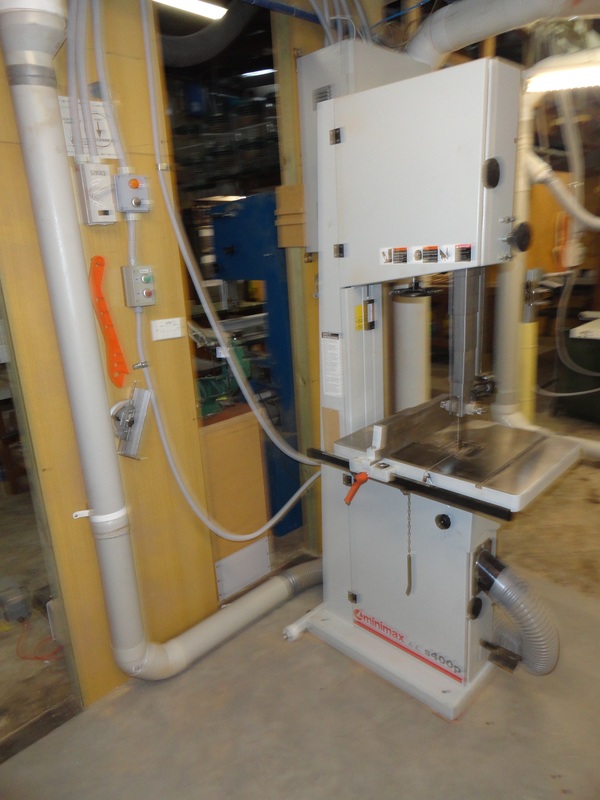
We have installed a Minimax Table Saw Model SC2 Classic fitted with a 2.2KW (3HP) 3 phase 415 volt AC drive motor. Also a Minimax Model S400P US Bandsaw fitted with a 1.5KW (2HP) 3 phase 415 volt AC drive motor.
Recently we upgraded the main power supply to our Shed and took it from 40 amp single phase to 60 amp three phase. This has allowed us to better manage our power loading since we currently have thirteen single phase fixed machines giving a reasonable size demand on our power system. Also we have numerous hand held electrical woodworking machines used on the benches.
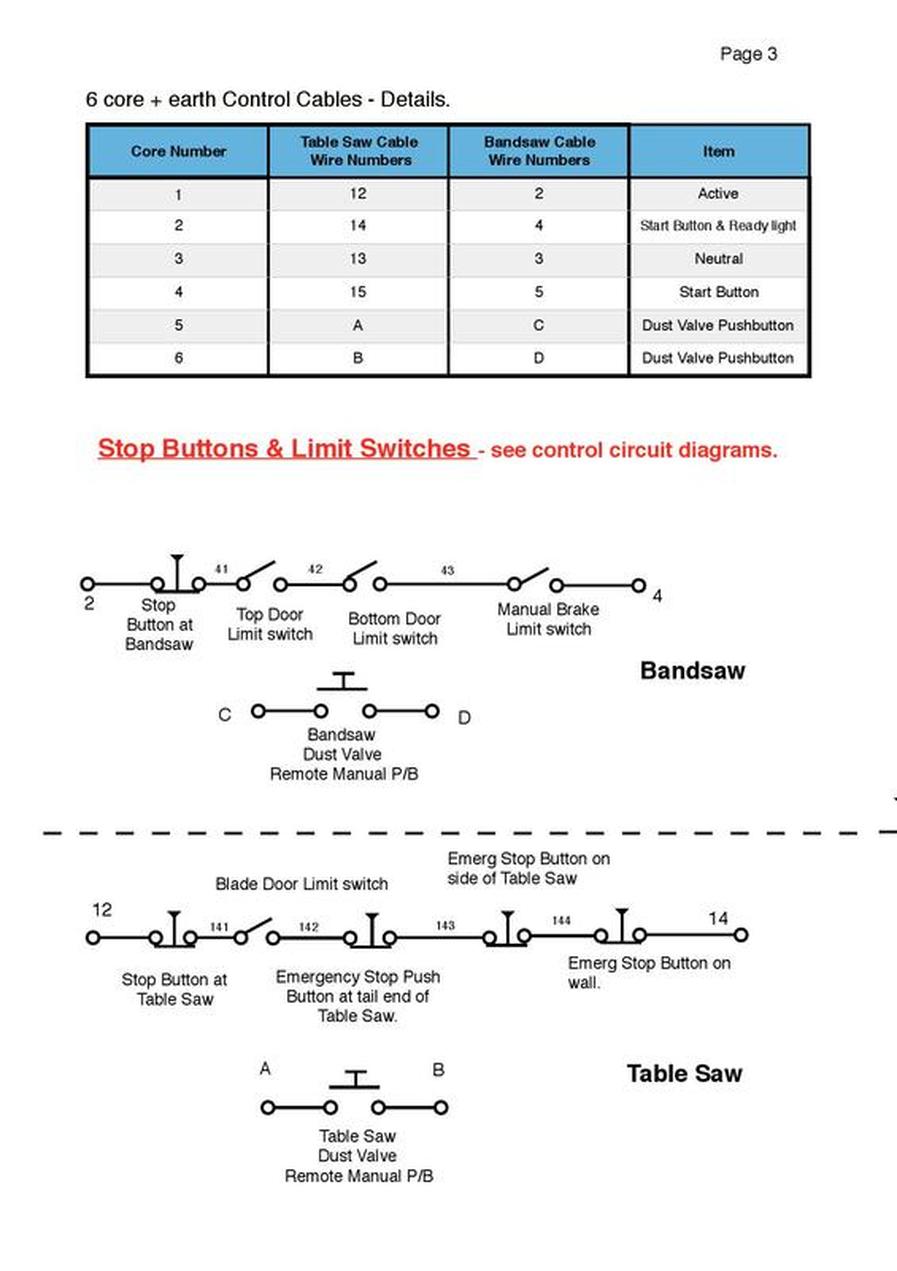
The two Minimax machines are each powered by their own Powtran Brand Variable Frequency Drive units (VFD) to provide a 'soft start' feature. Both machines have had their electrics modified. The electrical control Start/Stop devices and main contactor/overload units were removed. The safety devices such as door limits and emergency stops etc. were retained but wired to the external main control cubicle. All motor protection is incorporated in the VFDs. Both machines have their VFDs and associated electrical control devices mounted in the same cubicle (see photo and circuit diagrams). The motors in both machines are cabled in 2.5 square mm 3 core + earth, screened flexible cable especially made for VFDs (see details below).
Below are the circuit diagrams and power supply ('single line') diagrams (4 pages) for both drives. Also the "stop" devices are shown on page 3. You will note that the operator has a main isolator located beside the machine so the drive can be electrically isolated when the blade or the drive needs to be worked on .
Both machines have panel ammeters installed to assist with fault finding, blade wear and loading.

Screened Motor Cable must be EMC [Electromagnetic Compatible].
The motor power cable running from the VFD to the motor is a 4 core screened cable and special attention must be given to correctly earthing the screen...see diagram below:
The motor power cable running from the VFD to the motor is a 4 core screened cable and special attention must be given to correctly earthing the screen...see diagram below:

How to programme the Powtran VFD is outline in the simplified help document below this table. There is not a lot involved as these drives are only using the 'Soft Start' features of the VFD. The table below provides a list of the settings for the three VFDs we have in our Shed.

Simplified Programming Help Document:
| powtran_p19100_series_vfd_programing.pdf |
August 2016.
Table Saw & Bandsaw - Blade Speed Checks & Adjustments.
Generally the specification sheets for these type machines quote power (HP & KW) with voltages(single and three phase) and frequencies(both 50Hz & 60Hz). Then when they quote 'Blade Speed' they fail to say at what frequency....why do they need to?....see speed formula below.
There is a small amount of slip rpm (3 to 5%) but is is negligible here.
So the speed is directly proportional to the frequency of the power system. 4pole AC induction motor on 60Hz is ~1750rpm while on 50Hz it is ~1400rpm.
So to get an understanding of just what speed our two machine's blades were operating at we purchased a digital tachometer.
So the speed is directly proportional to the frequency of the power system. 4pole AC induction motor on 60Hz is ~1750rpm while on 50Hz it is ~1400rpm.
So to get an understanding of just what speed our two machine's blades were operating at we purchased a digital tachometer.
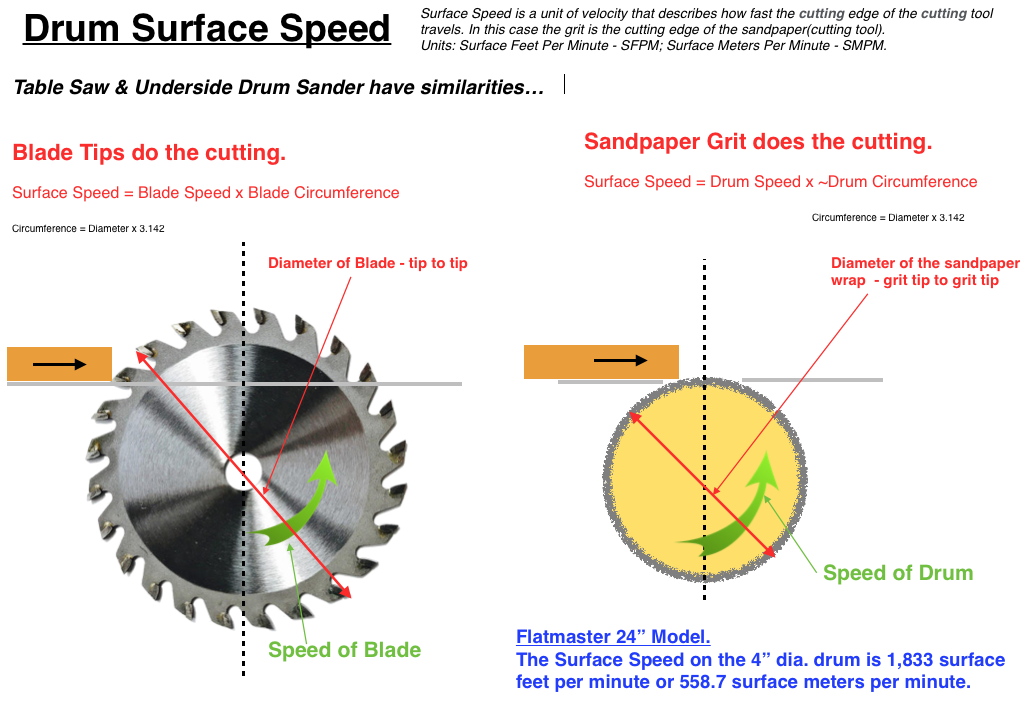
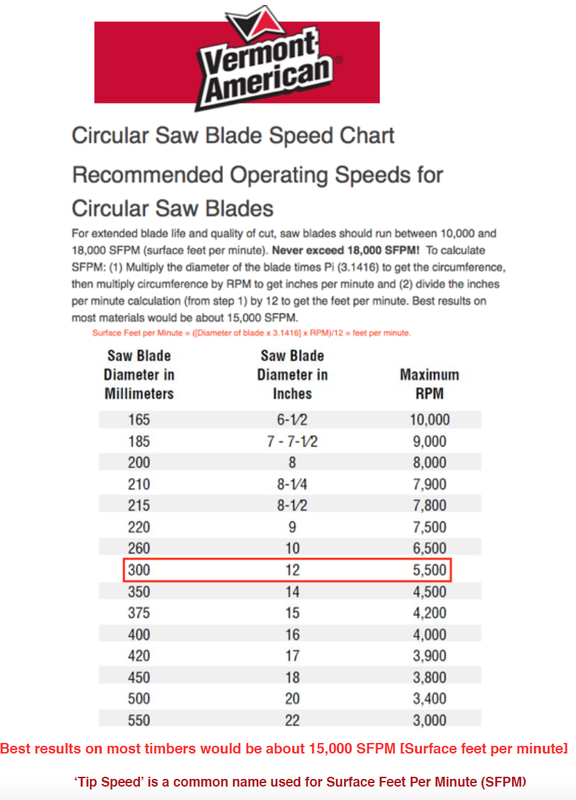
Blade Tip Speed is the drum's SFPM(surface feet per minute or surface metres per minute) = Speed of the Blade x Circumference of the Blade. Therefore since the speed of the blade varies with the frequency. Blade Tip Speed should be quoted at a particular frequency.
Minimax Table Saw - Model SC2 Classic:
The operator's manual listed the blade speed as 3,500rpm and on checking we found it to be 3,572rpm @ 50Hz. Then looking on the internet we found Vermont American giving a general recommendation for 'Blade Tip Speed' of 15,000 SFPM (Surface Feet per Minute). From the table below it can be seen that we would be running our blade at ~4,800rpm @ ~67Hz to achieve ~15,000 SFPM. The important thing here is for us not to exceed 60Hz as the load torque will start to decline above this frequency/speed. We could also change our pulley ratio and speed everything up to achieve ~4,800rpm blade speed at a frequency of 60Hz....but we are happy with the saw's performance....13,446 SFPM @ 60Hz.
We have a 12”(305mm) diameter; 60 teeth; TCT blade fitted.
We have a 12”(305mm) diameter; 60 teeth; TCT blade fitted.

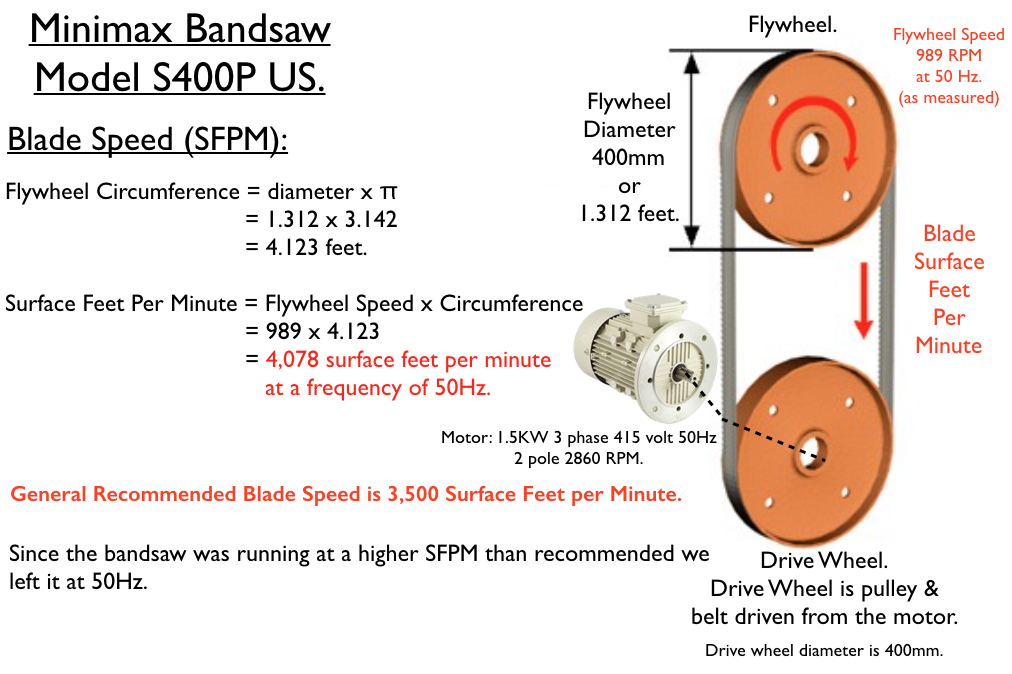
Minimax Bandsaw - Model S400P US.
The Blade Speed on a Bandsaw is measured in Surface Feet per Minute(SFPM) not RPM. The Operator's Manual listed the Flywheel speed as 980rpm and we measured it at a similar value of 989rpm @ 50Hz. From the calculations below you can see that 4,078 SFPM is higher than the 3,500 SFPM recommended when looking up several websites. So we have not made any changes to the frequency and left the Blade Speed at 4,078 SFPM @ 50Hz.
In March 2019 we needed to change the tyres and found the 400mm diameter wheels were actually 395mm diameter....this puts the calculations out slightly.
In March 2019 we needed to change the tyres and found the 400mm diameter wheels were actually 395mm diameter....this puts the calculations out slightly.
Those that would like to know more about the Types & Characteristics of Loads when using variable frequency drives....click on the button below.
Main Isolator, Start/Stop Buttons, Ready light & Dust Valve manual control button....mounted on the wall panel.
Main Isolator, Start/Stop Buttons, Ready light & Dust Valve manual control button....mounted on the wall.
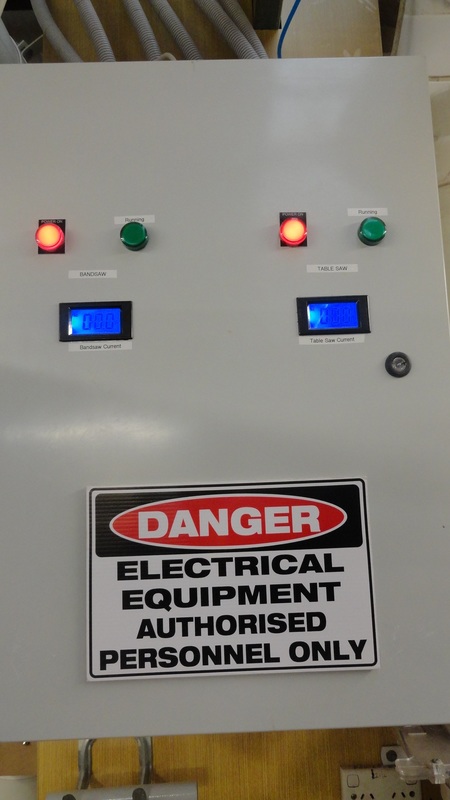
Ammeters assist in load checks....also a good guide for blade wear/blunting.
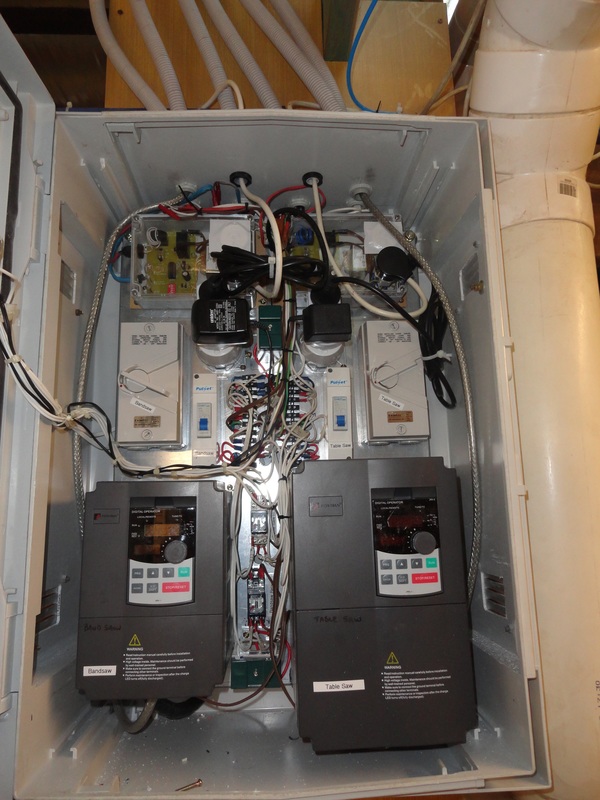
Master/Slave control units to automatically open the dust valves are mounted in the top section of the panel.
Powtran Variable Frequency Drive Units
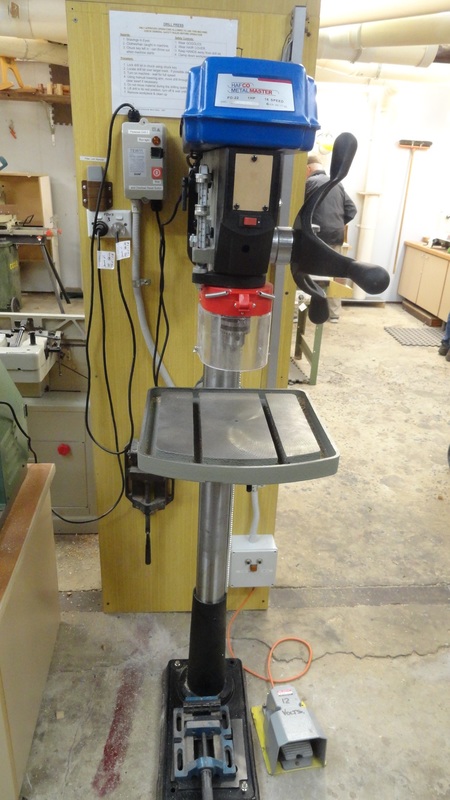
14. Pedestal Drills...Foot Control.
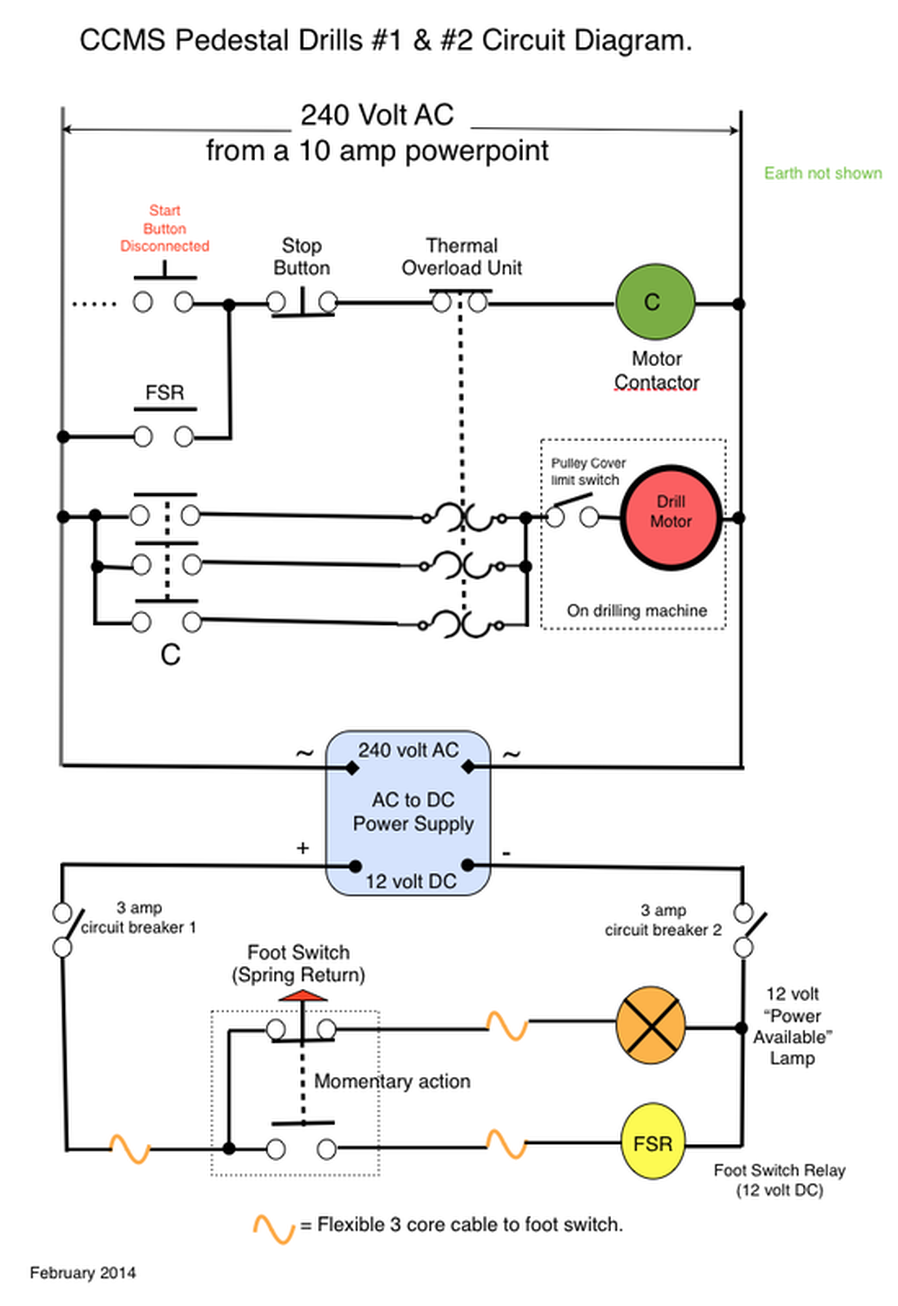
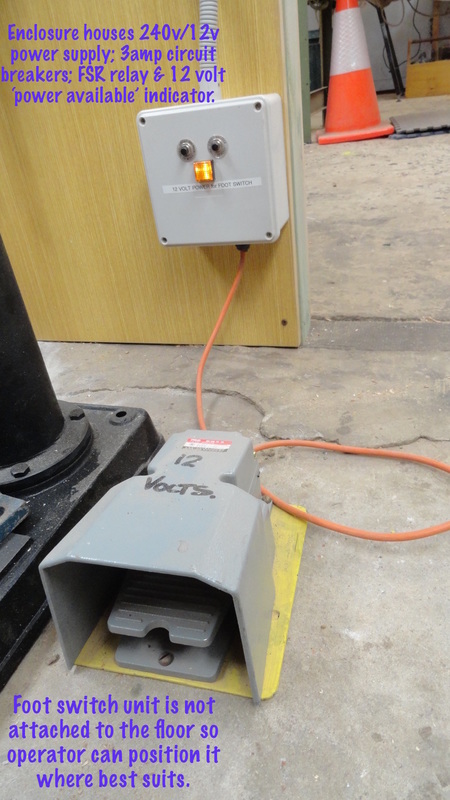
We have chosen to electrically modify our two pedestal drills to Foot Switch Control rather than the usual Start & Stop Push Button Control. The spring return type foot switch and it's flexible cable are operated on low voltage (12 volt DC) with a 3 amp circuit breaker in each leg of the 12 volt DC...."a safe environment if the flexible cable is accidentally crushed".
We find Foot Switch Control gives the operator a safer option if the drill needs to be stopped in an emergency...."you just remove your foot off the foot switch and step out of harms way....the drill will stop without having to push the stop button".
The electrical circuit diagram is shown below. A 3 phase motor starter unit has been used because they are readily available.
Note: A Licensed Electrician is required to install this control system.
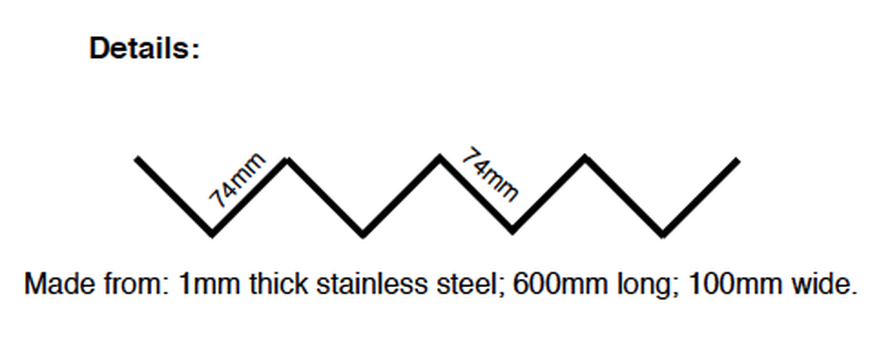
15. Sausage in Bread & Taco Rack Holder.

We use these holders when fundraising at Bunnings BBQ stalls. Customers often ask where we get them from....here are the details on how to make them. Build or purchase a small sheet metal bender. Then see photos and drawing below. Note...photo directly below is of a wider version.

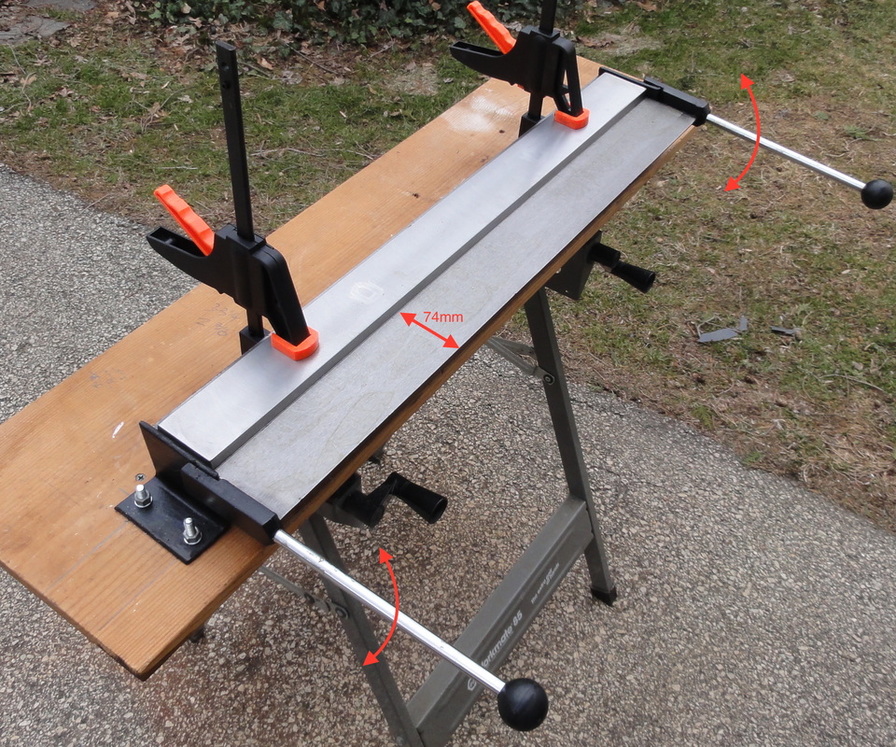
A Sheet Metal Bender
16. Wood Toxicity Table.
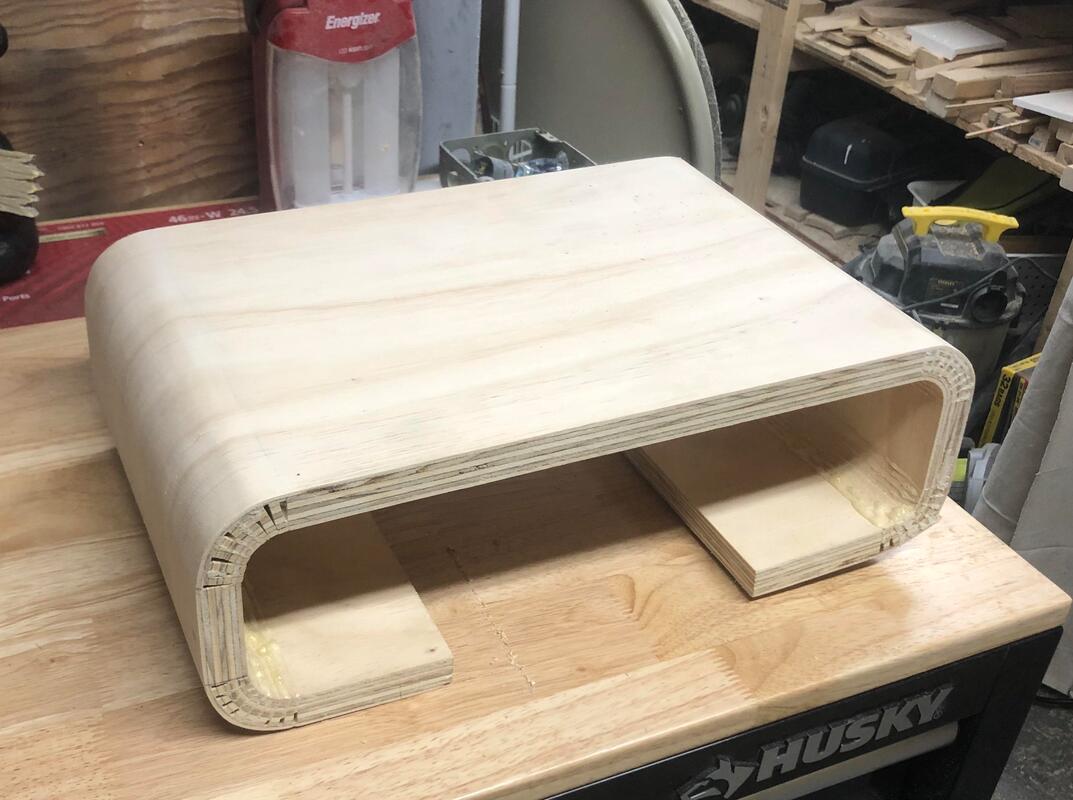
17. Kerf Bending.

|
|